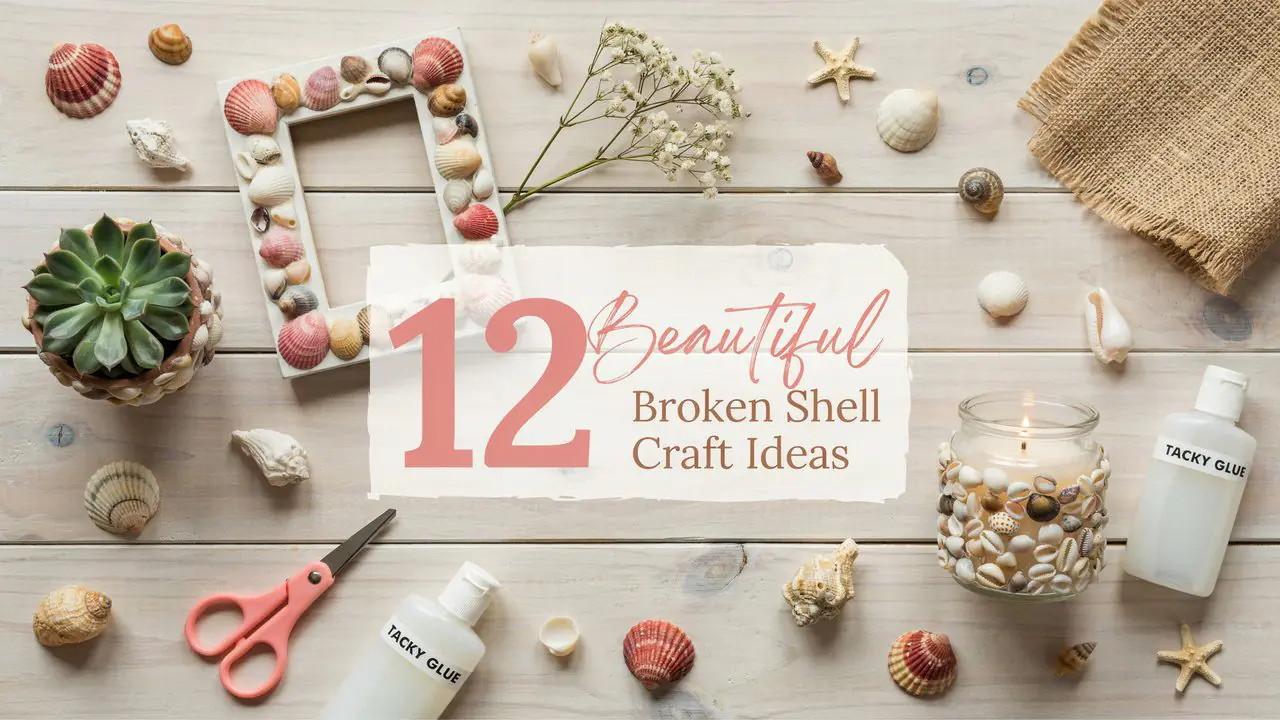
Broken shells are one of those little things I can never throw away. Even when they are chipped, cracked, or no longer “perfect,” they still carry that soft beachy texture that makes a handmade project feel special.
So if you came home from the beach with a bag of shell pieces, or you already have broken seashells sitting in a drawer, these broken shell craft ideas are a beautiful way to turn them into coastal decor, handmade gifts, and pretty little pieces for your home.
1. Broken Shell Mosaic Picture Frame
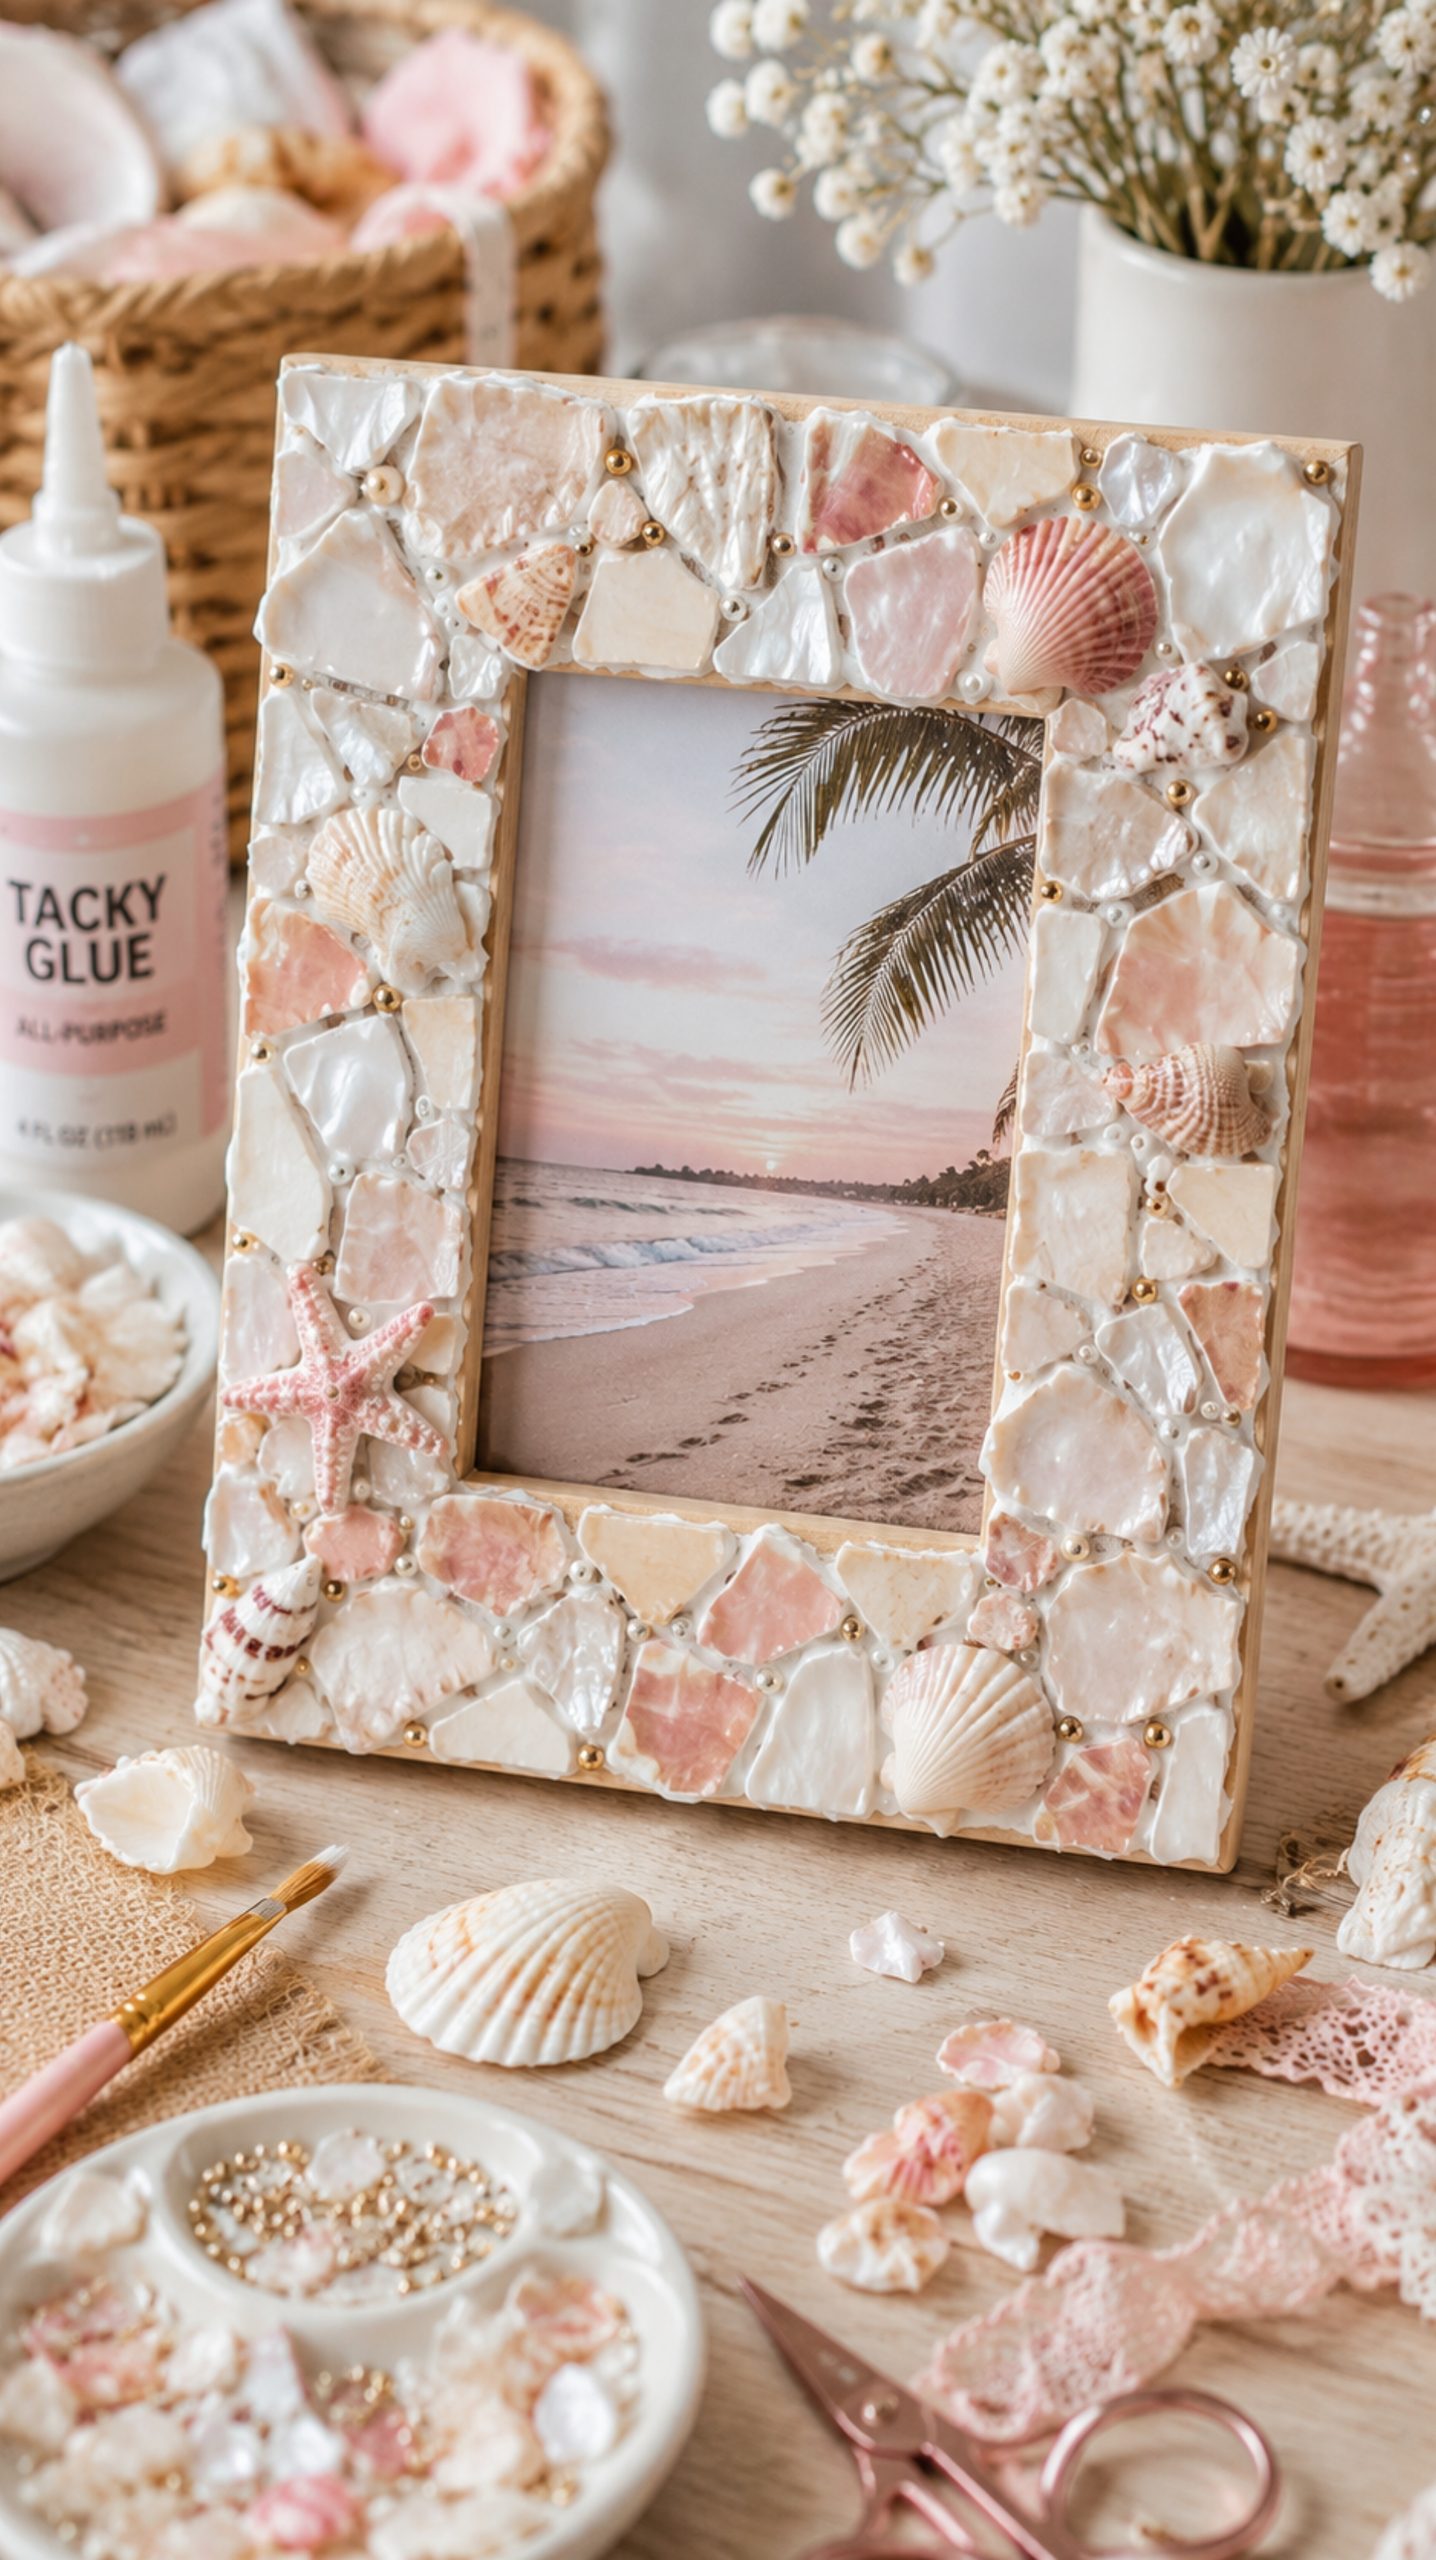
A broken shell mosaic picture frame is one of the easiest ways to turn shell pieces into something that looks intentional and beautiful.
Start with a plain wooden frame and cover the border with small shell fragments. You can keep the colors soft and neutral with white, cream, and beige shells, or mix in pink, gray, and pearly pieces for more texture.
What I love about this idea is that the imperfect shapes actually make the frame look more handmade and artistic. It is perfect for a beach vacation photo, a summer memory, or even a sweet coastal gift.
What you’ll need:
- Plain wooden picture frame
- Broken shell pieces
- Strong craft glue
- Tweezers
- Clear sealant
2. Broken Shell Coastal Trinket Dish
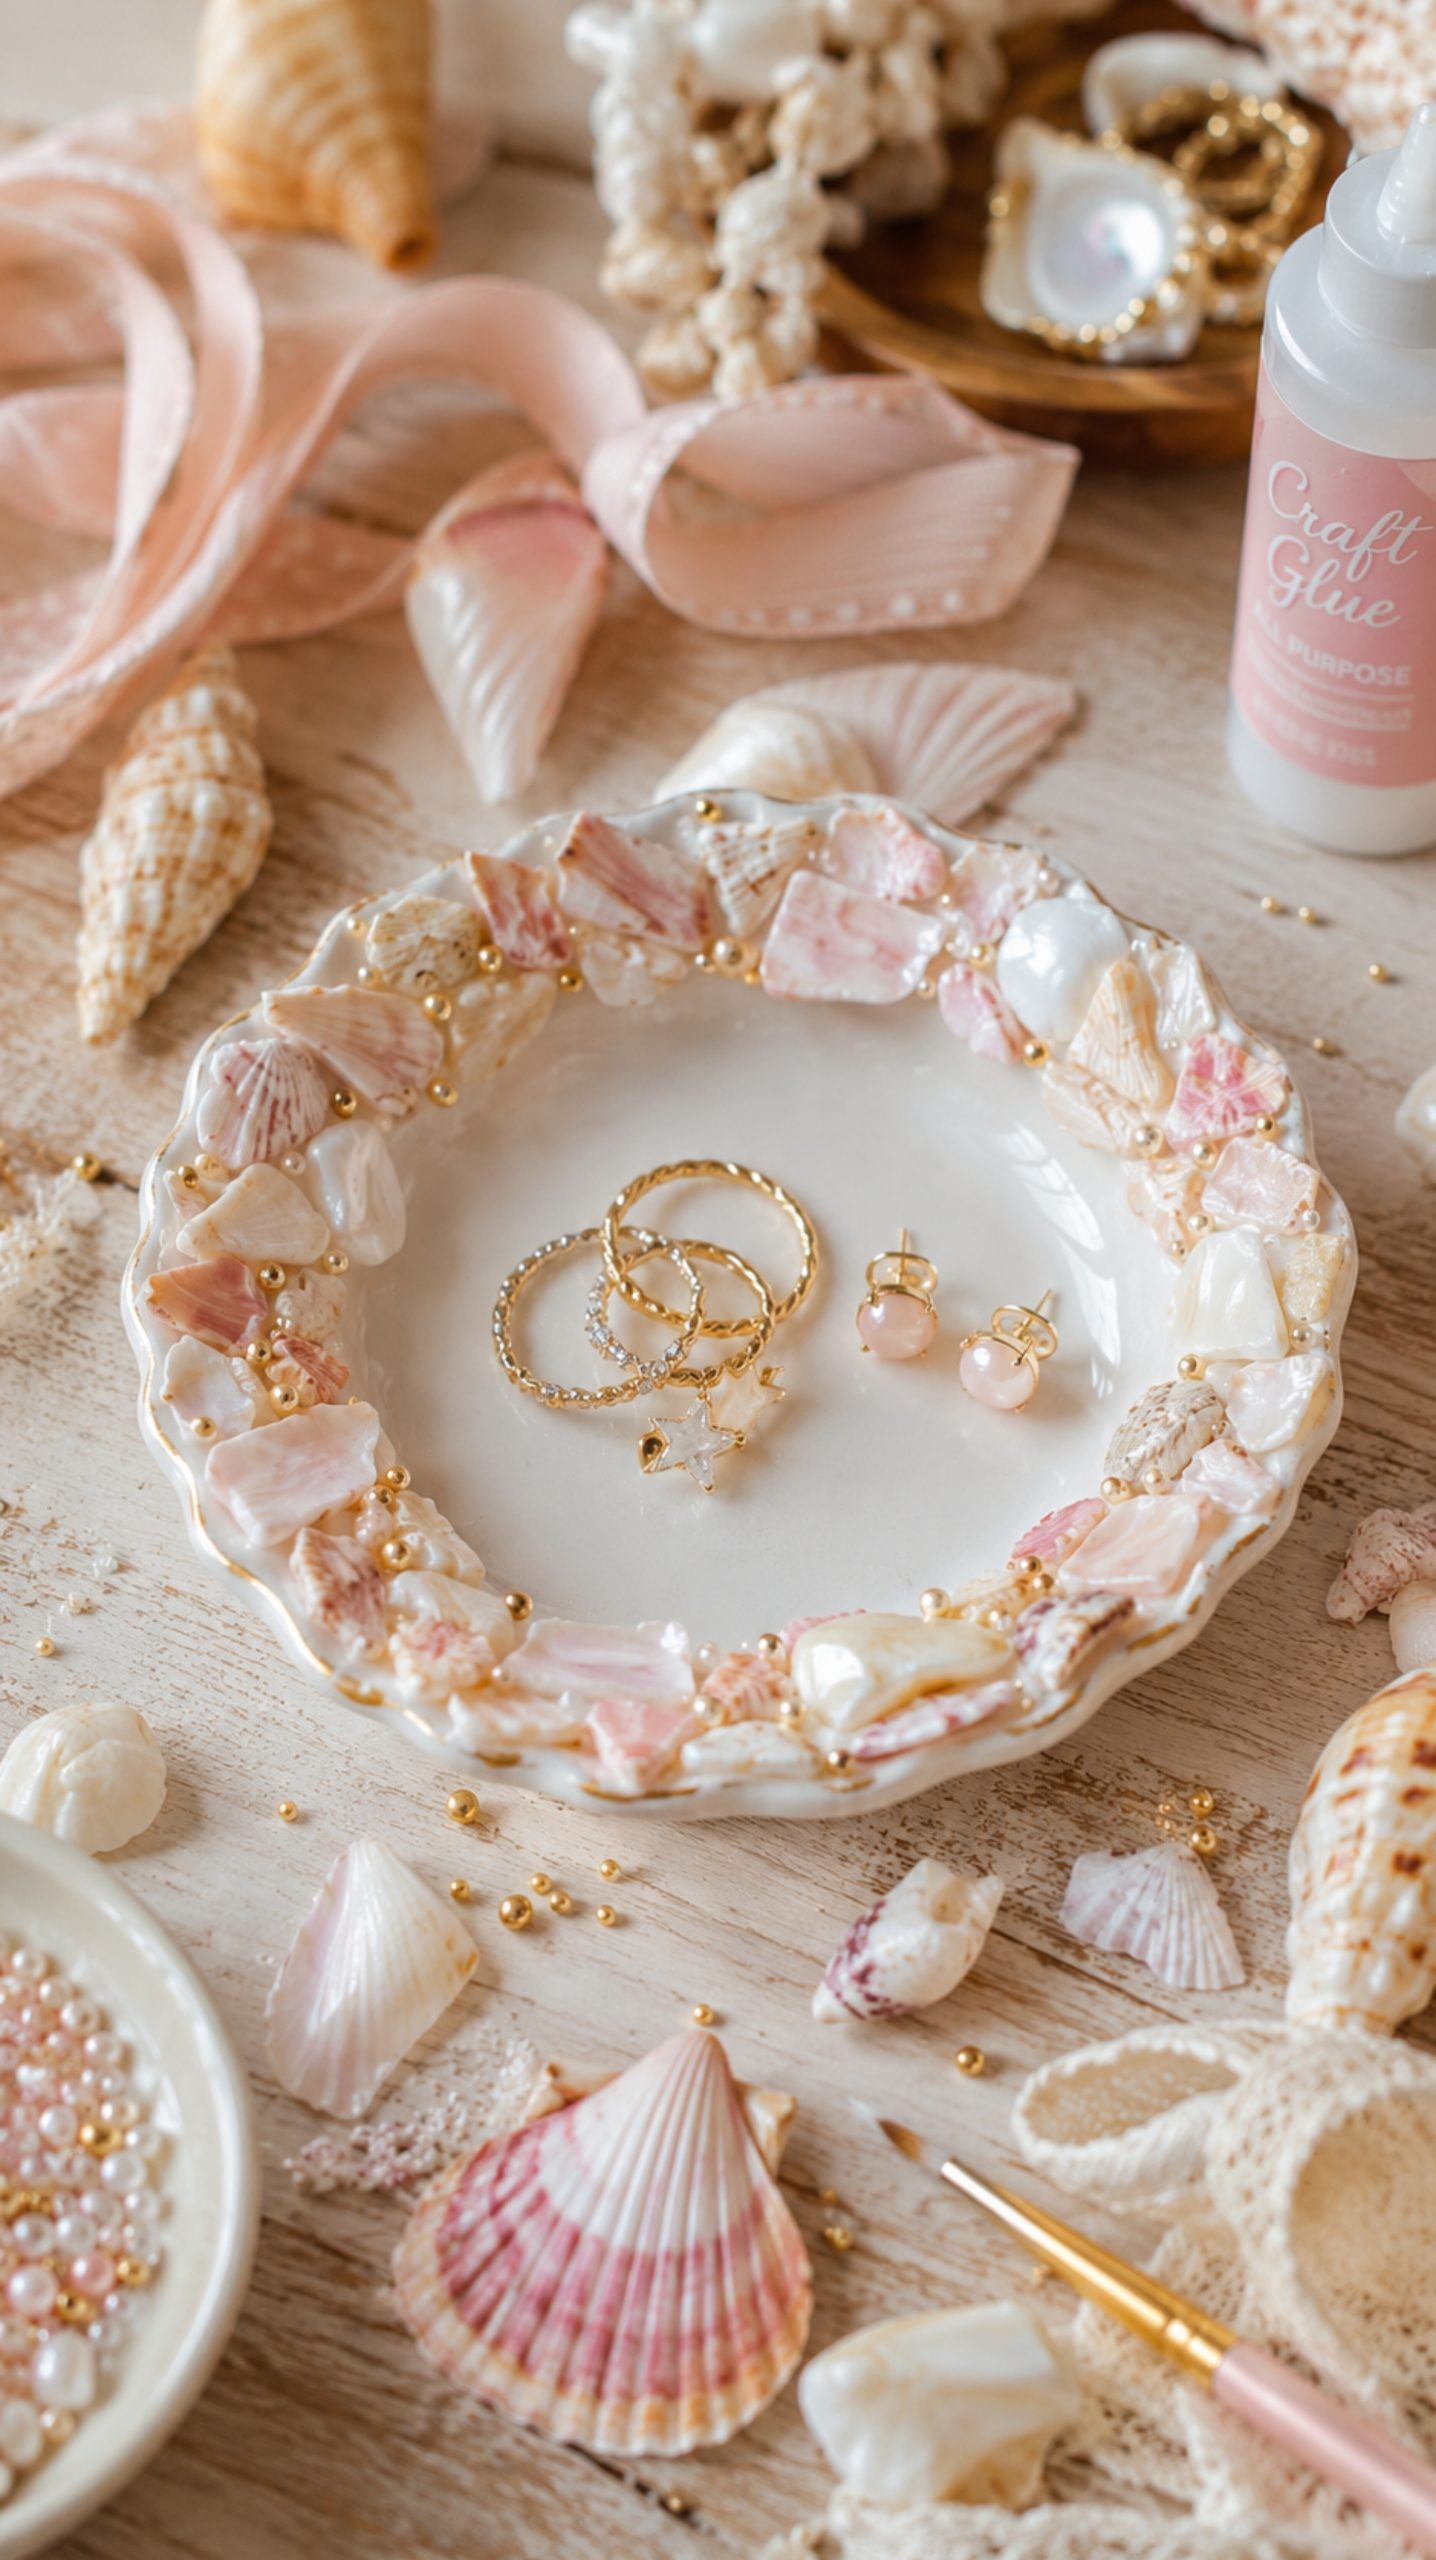
This is such a cute idea for jewelry, rings, earrings, or tiny bedside treasures.
Use a small ceramic or clay dish and glue broken shell pieces inside the bowl or around the rim. You can create a full mosaic look or keep the center clean and decorate only the edges.
For a more polished finish, choose shell pieces in similar tones, like ivory, sand, and blush. It gives the dish that soft coastal boutique look without making it feel too busy.
What you’ll need:
- Small ceramic dish
- Broken seashells
- Craft glue
- Clear gloss sealant
- Optional gold paint pen for the rim
3. Broken Shell Candle Holder Craft
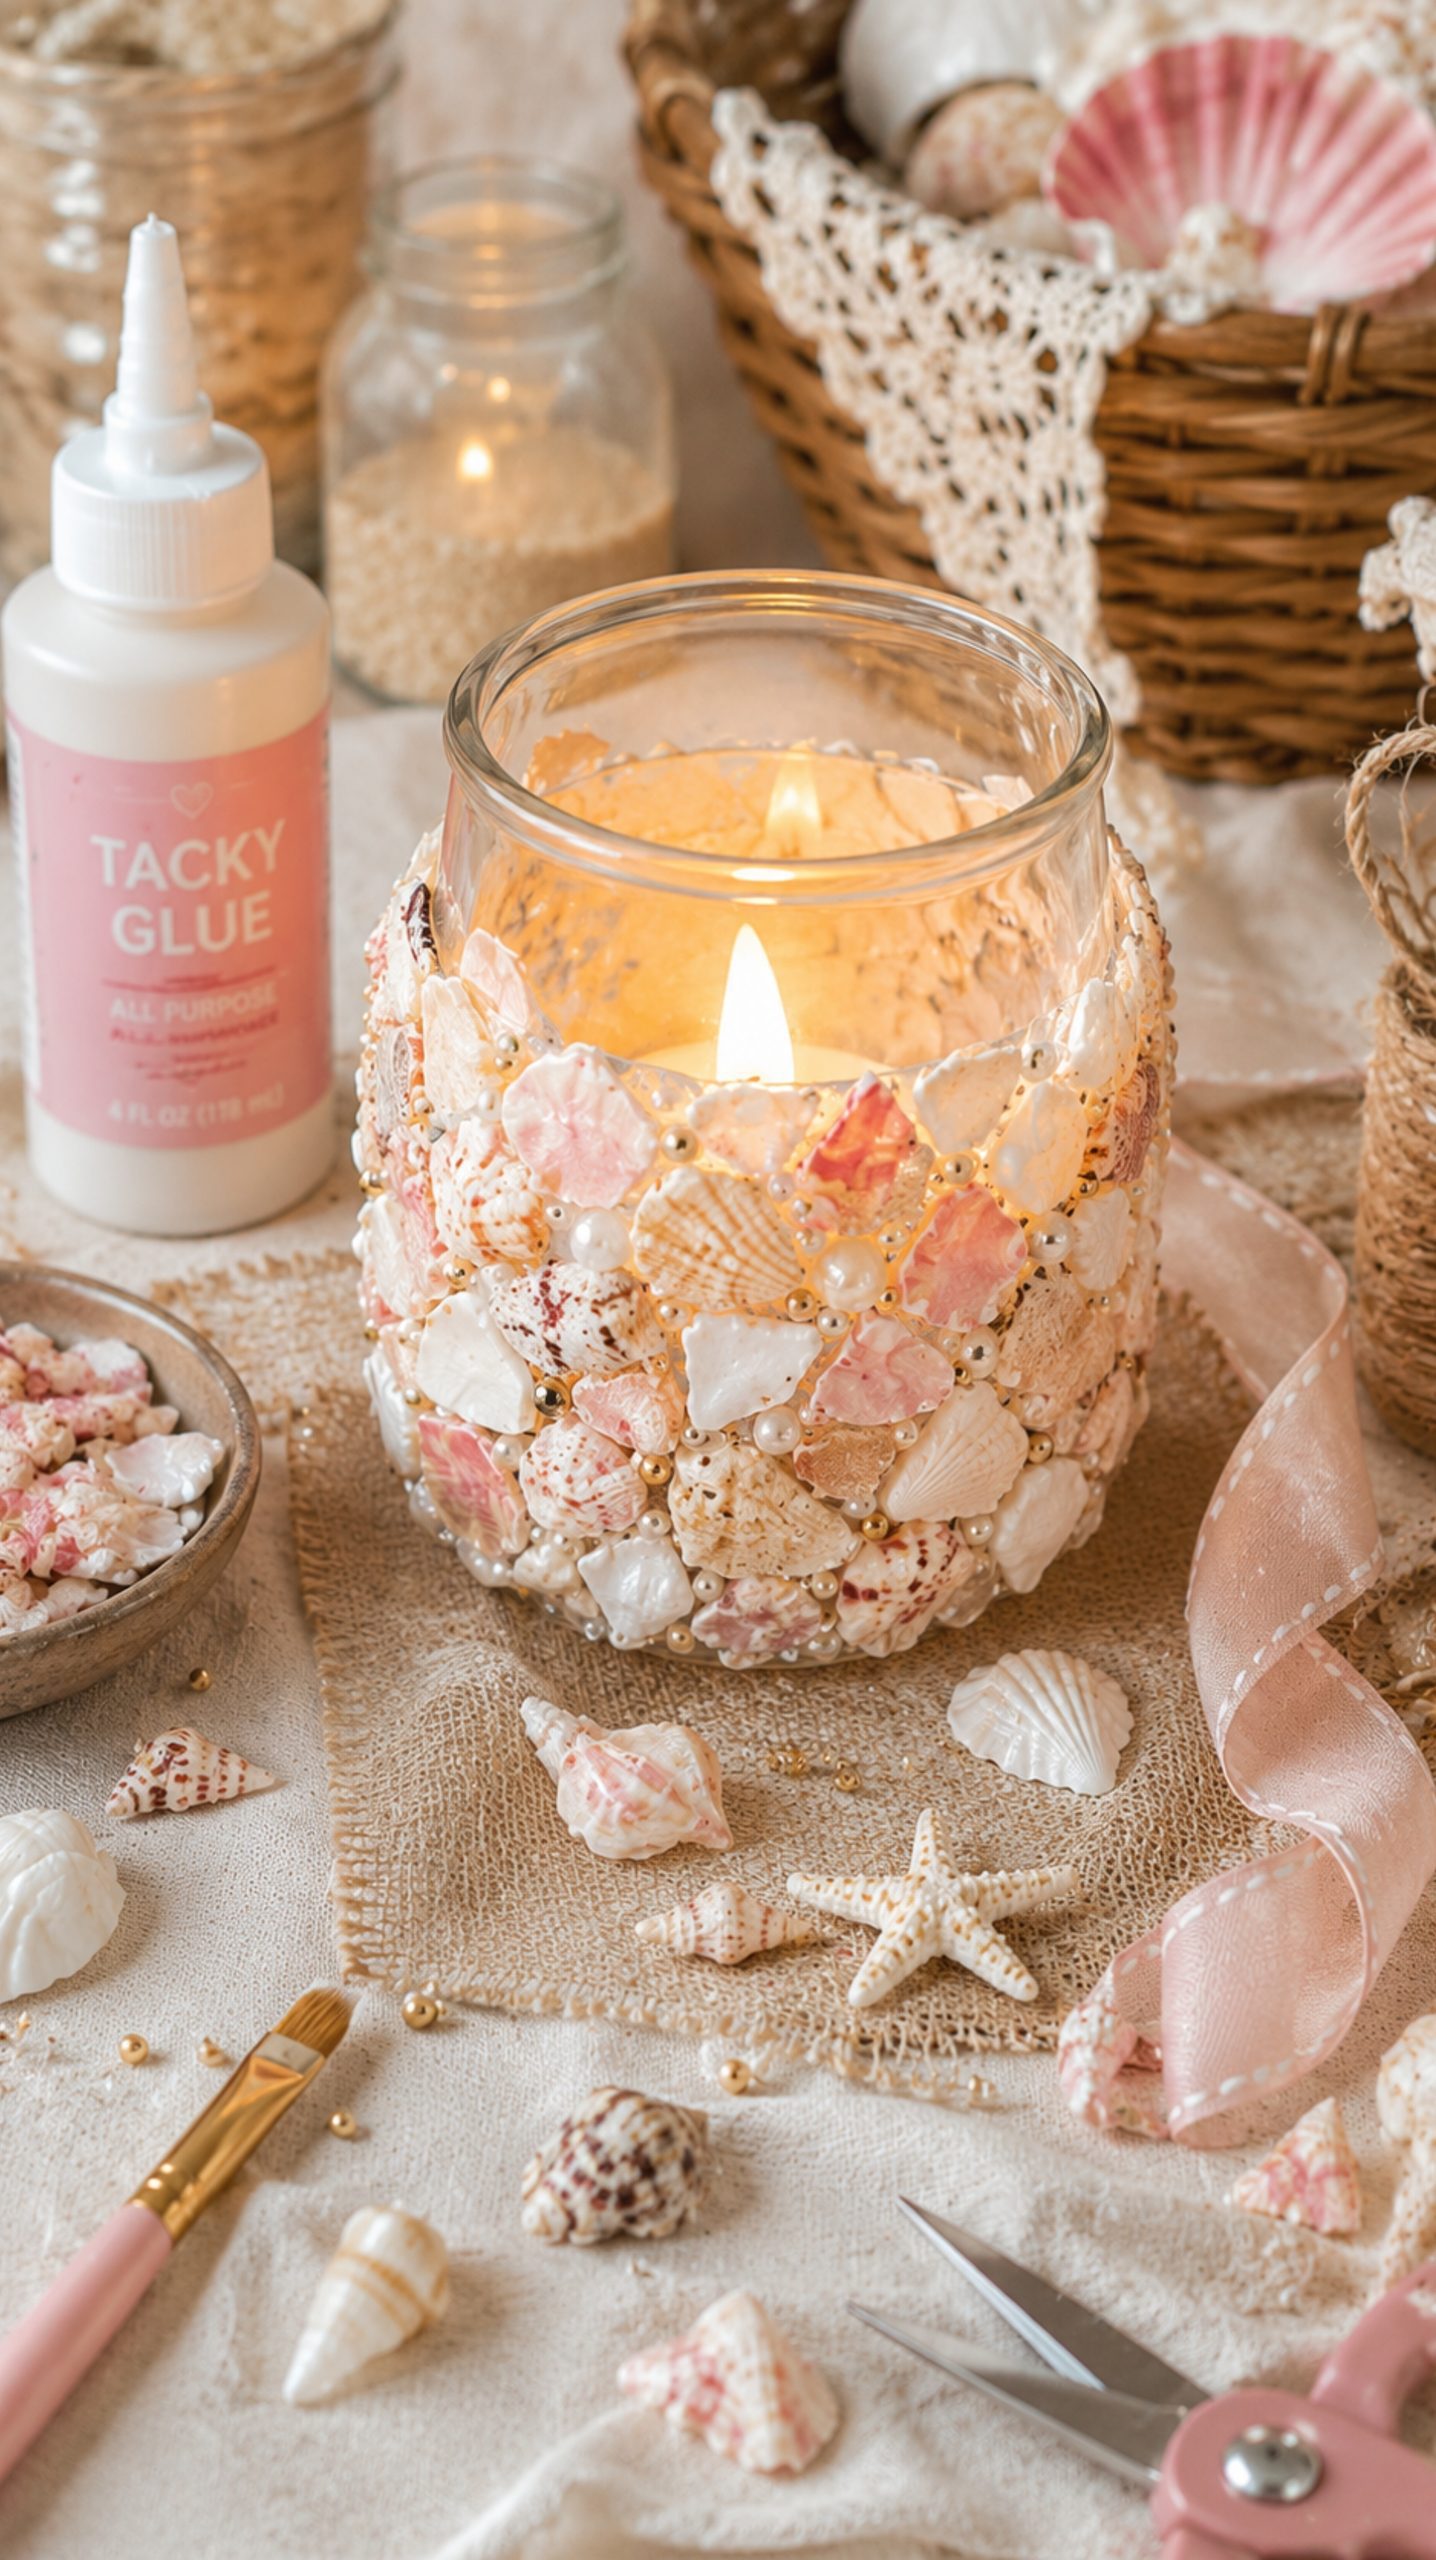
Broken shell candle holders look so pretty when the light hits the shell texture.
You can use a small glass votive and glue shell pieces around the outside. Keep the shells lower on the glass so the candlelight still glows through the top. I would use LED candles for this project, especially if the shells or glue sit close to the flame area.
This is one of those crafts that looks beautiful on a summer table, bathroom shelf, or coastal bedroom nightstand.
What you’ll need:
- Small glass votive holder
- Broken shell pieces
- Strong glue
- LED tealight candle
- Clear sealant
4. Broken Shell Wall Art Canvas
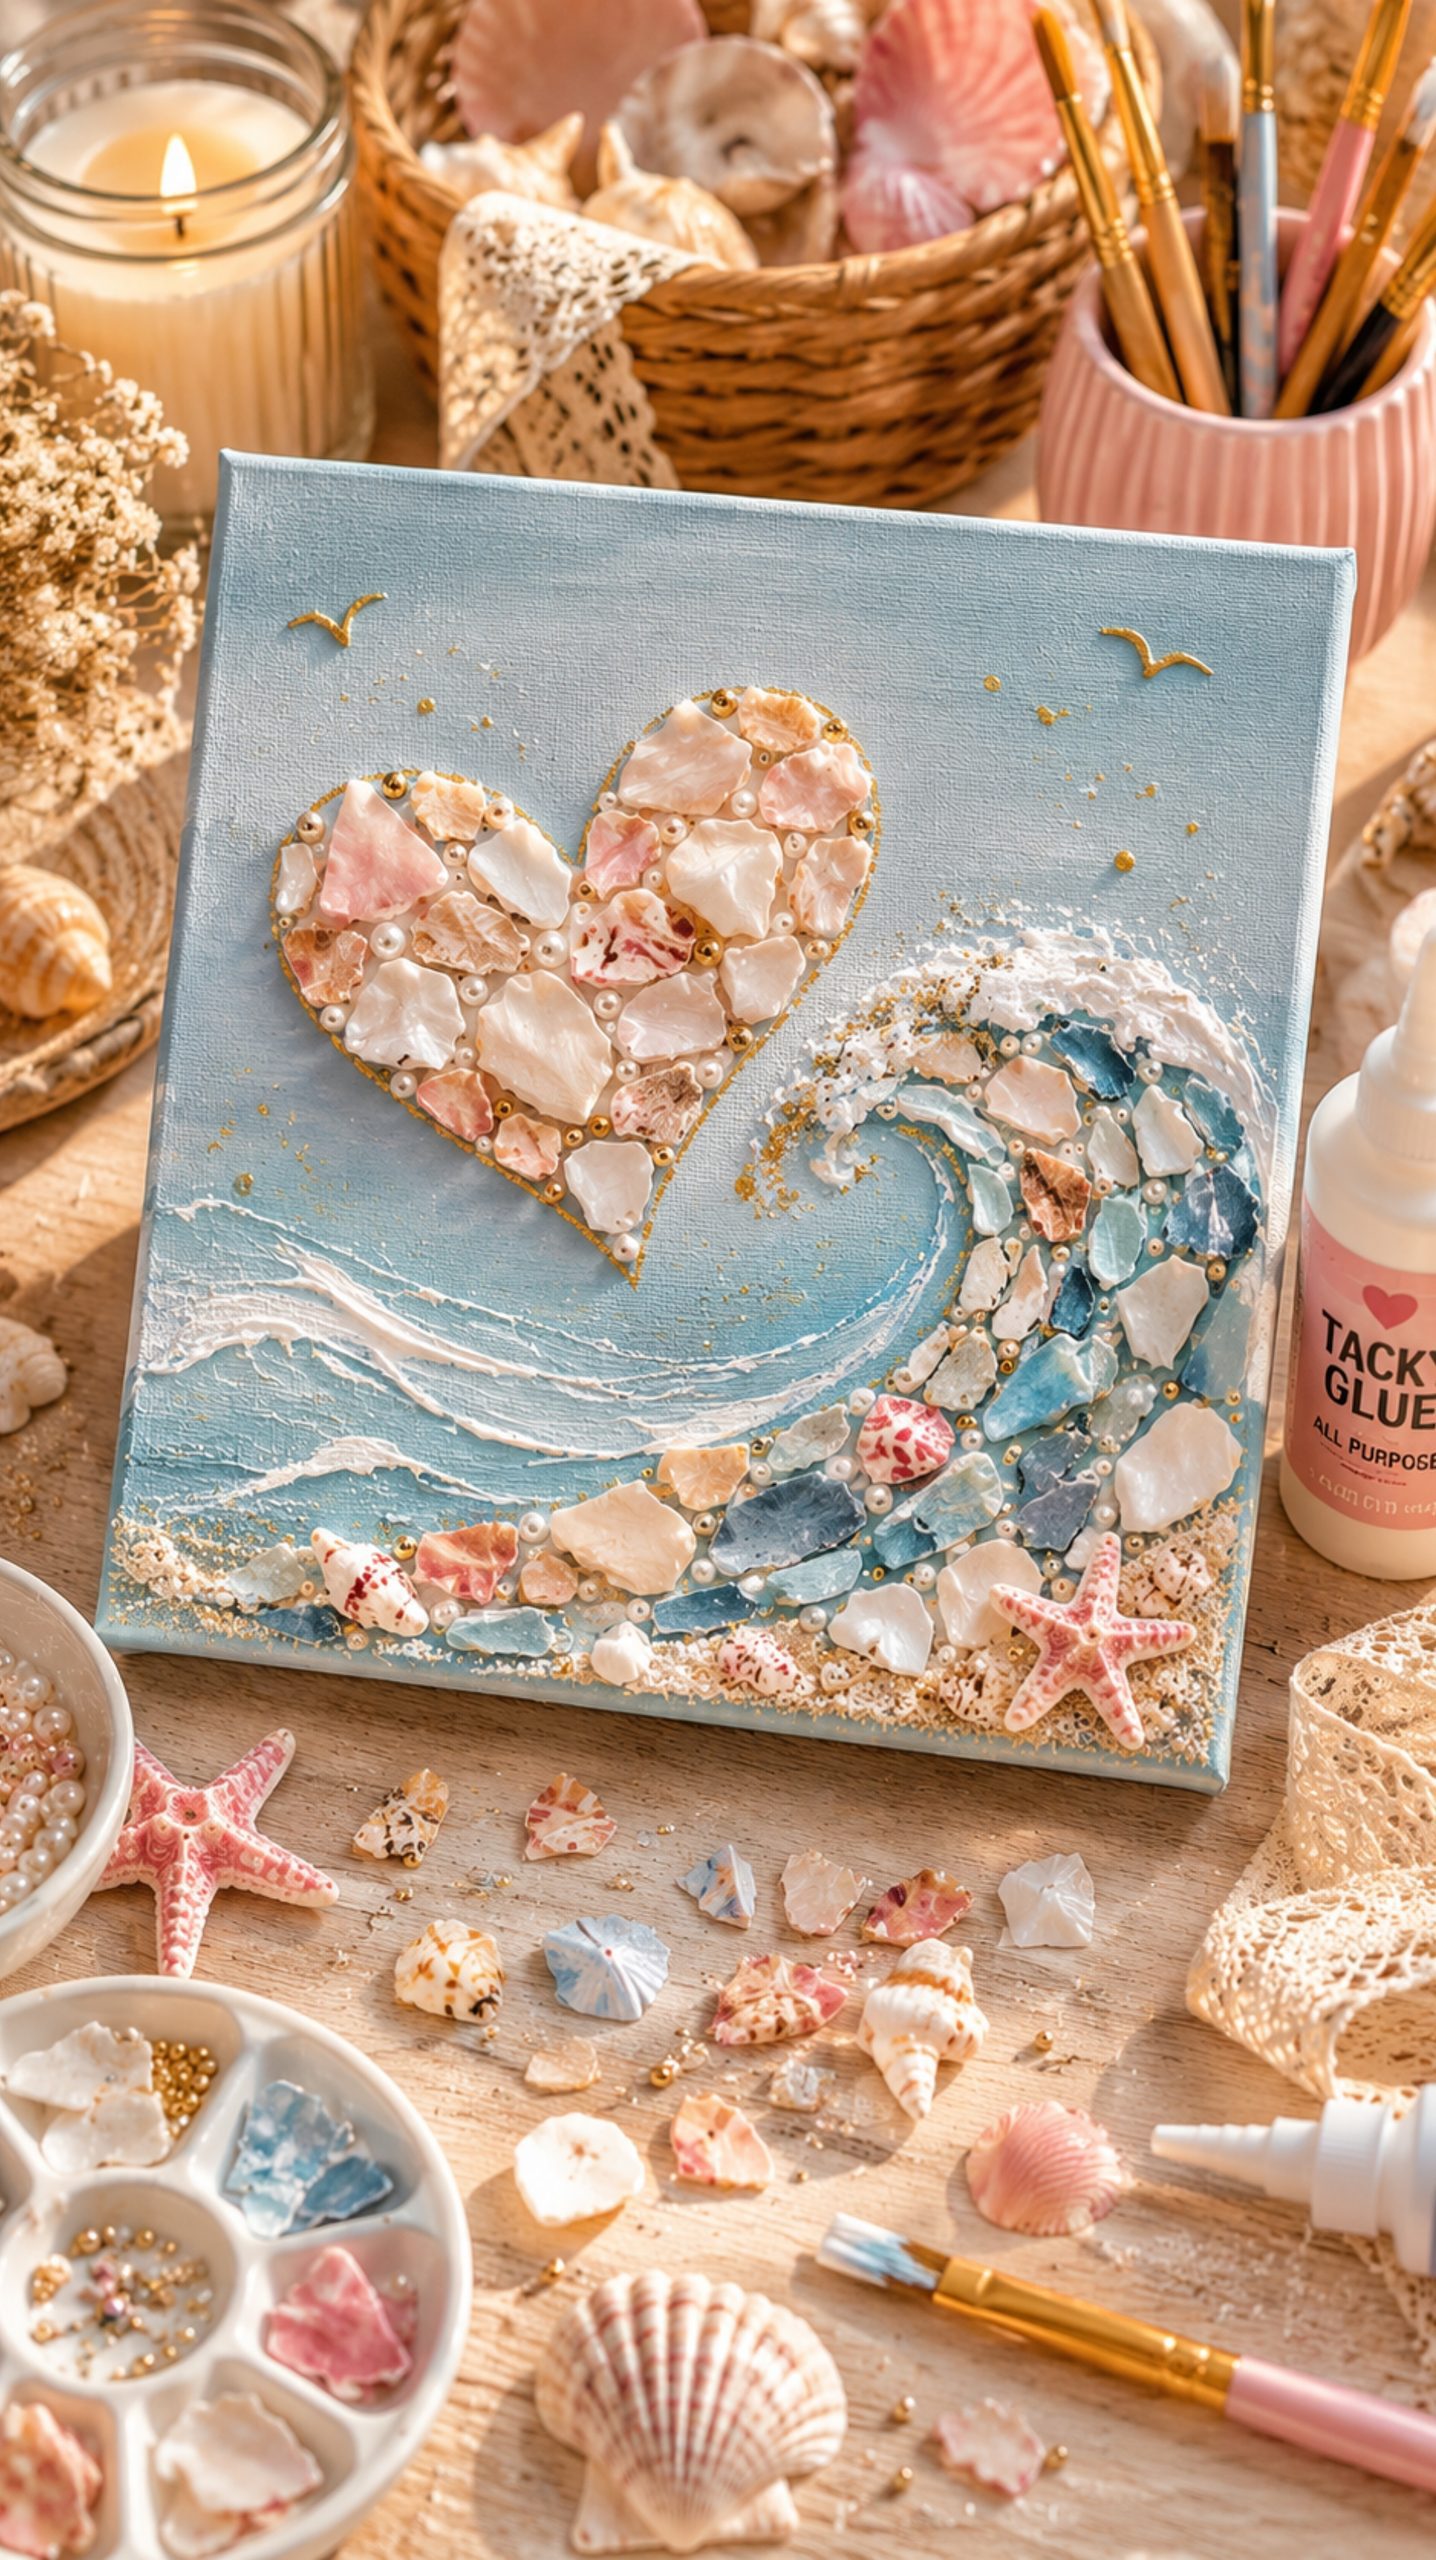
If you want something that feels more like decor and less like a small craft, try making broken shell wall art.
Use a blank canvas or wood panel and arrange the shell pieces into a simple shape. A wave, heart, sun, flower, or abstract coastal pattern would all work beautifully.
The trick is to keep the background simple. A soft white, beige, pale blue, or sandy linen color lets the shells become the main detail without making the piece feel cluttered.
What you’ll need:
- Small canvas or wood panel
- Broken shells
- Acrylic paint for background
- Craft glue
- Optional pencil sketch
5. Broken Shell Beach Memory Shadow Box
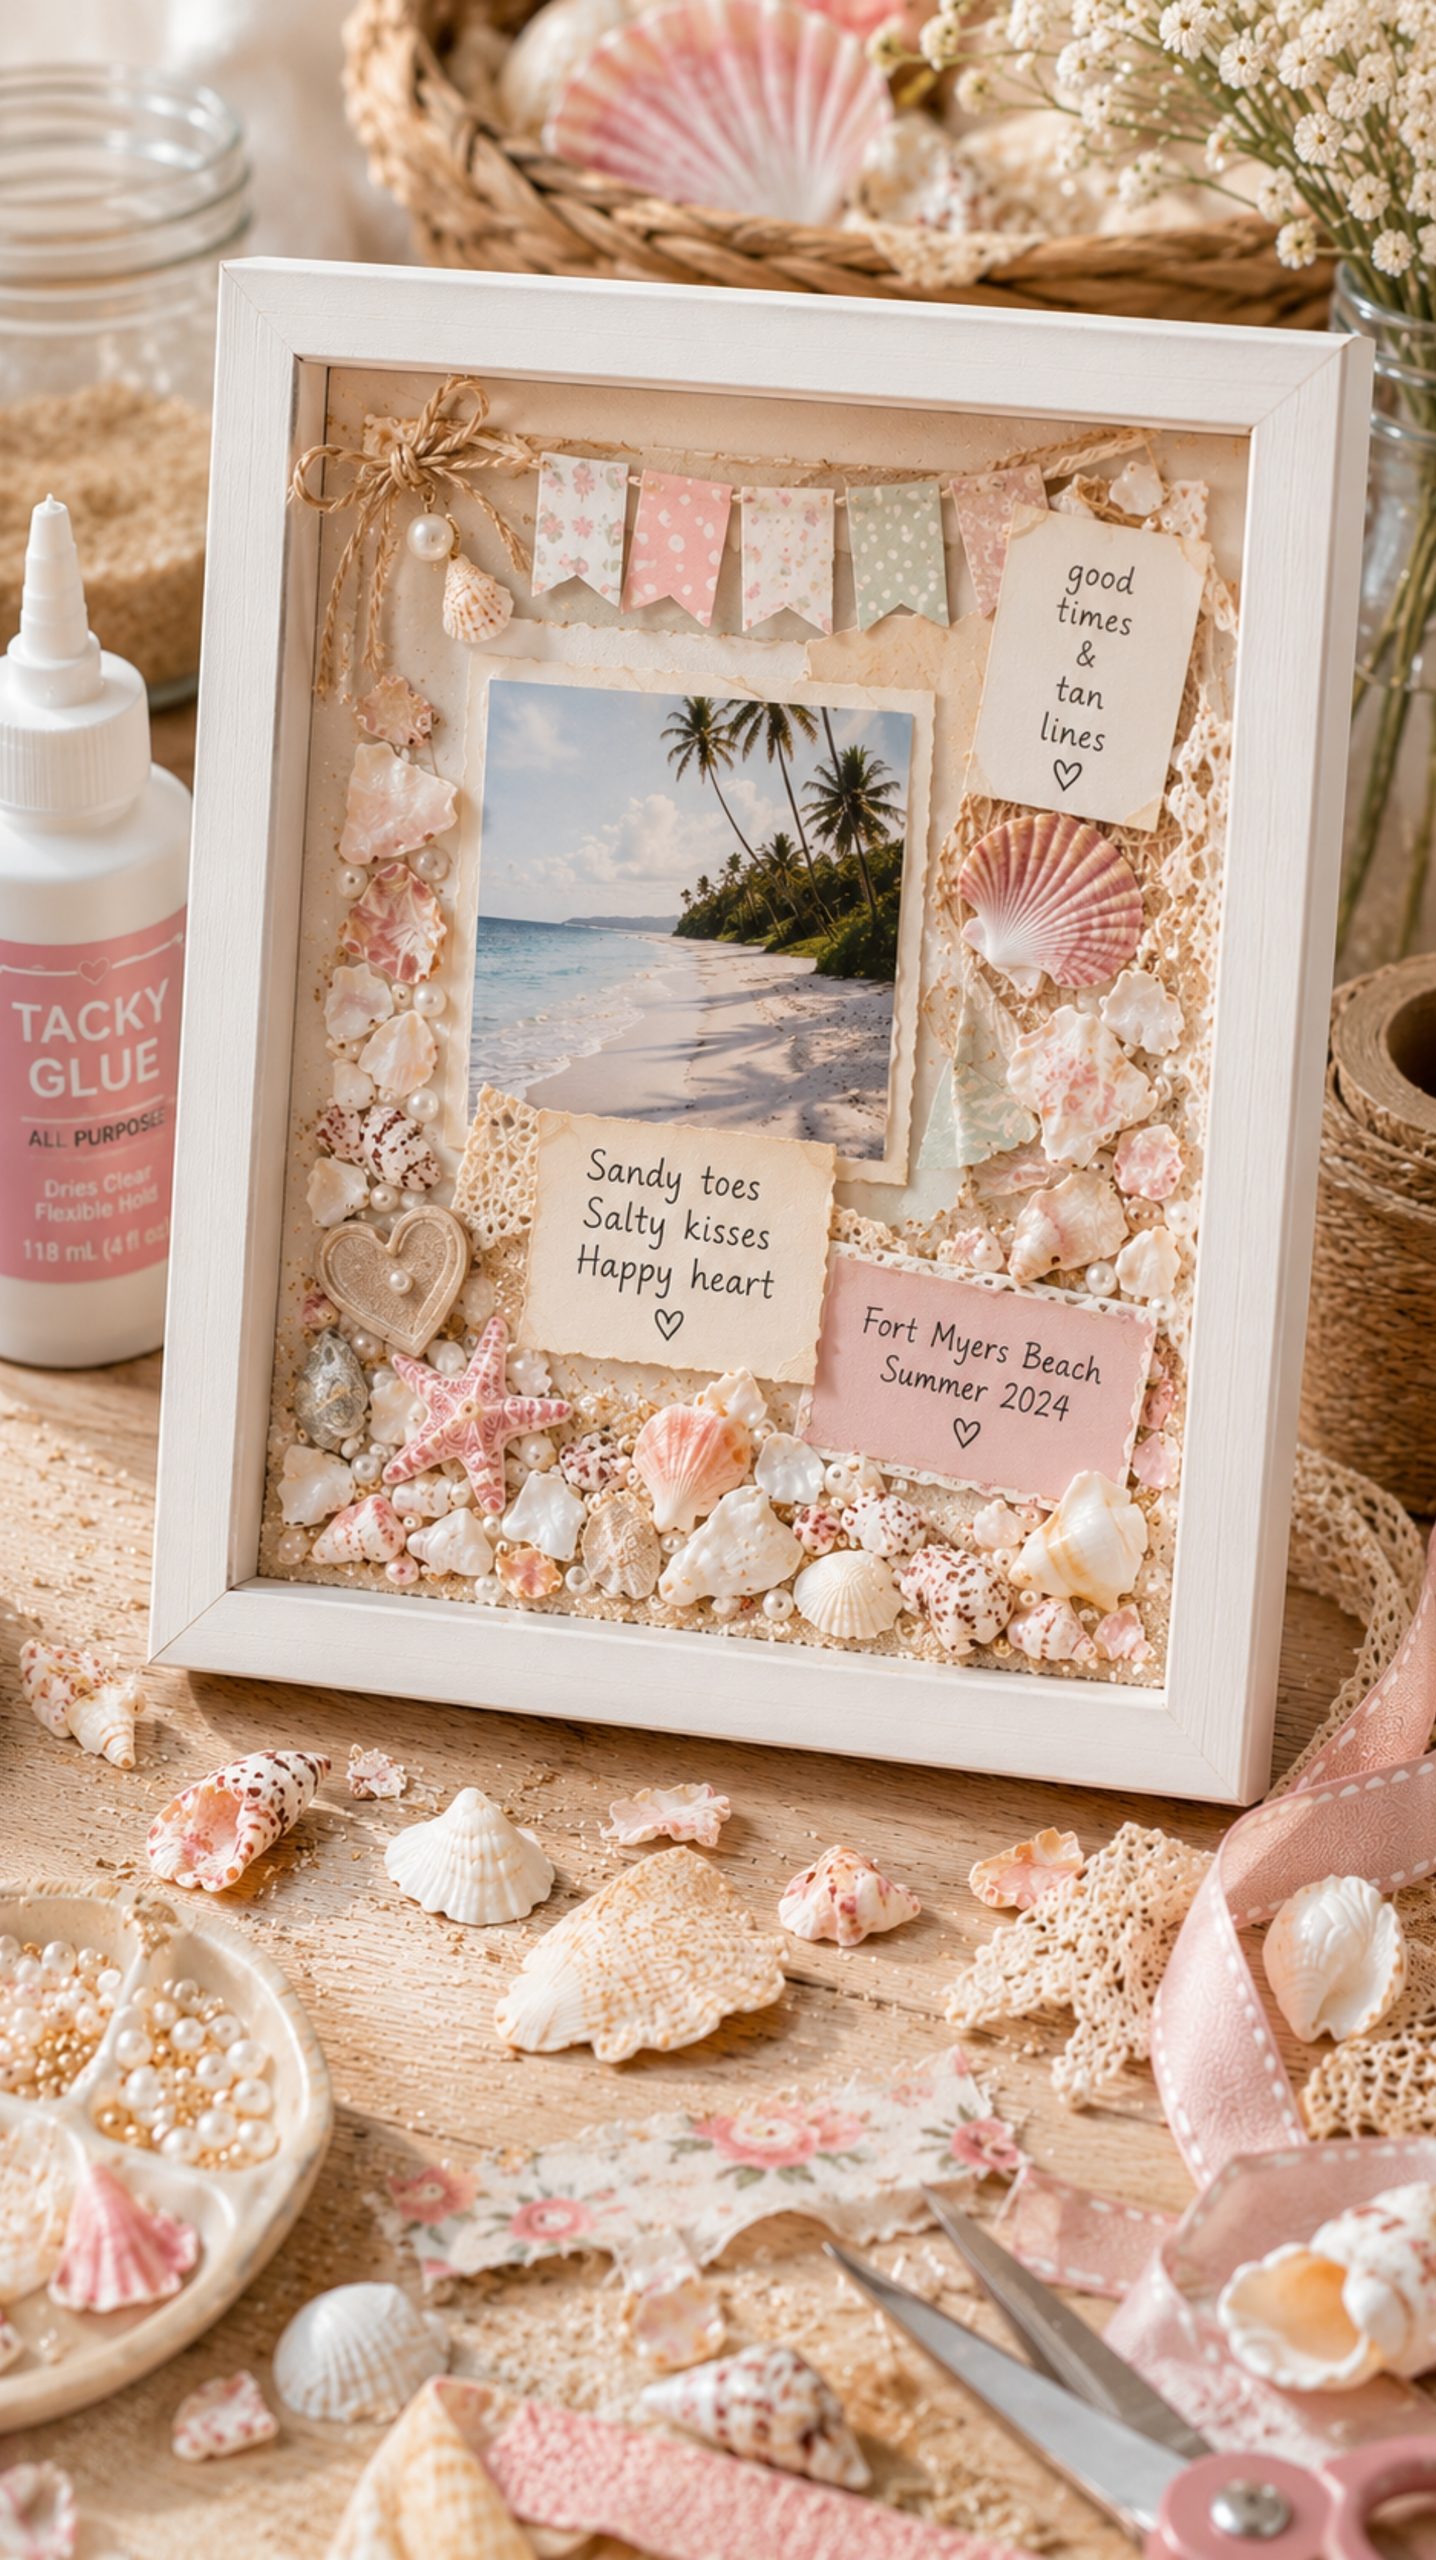
This idea is perfect if the shells came from a special beach trip.
Use a shadow box and create a little layered memory piece with broken shells, sand, tiny pebbles, a printed photo, and maybe a handwritten place name or date.
I love this because it turns broken shells into something meaningful. It is not just decor — it becomes a little keepsake from a day you want to remember.
What you’ll need:
- Shadow box frame
- Broken shell pieces
- Sand or small pebbles
- Printed photo
- Paper label or handwritten tag
- Glue
6. Broken Shell Flower Pot Makeover
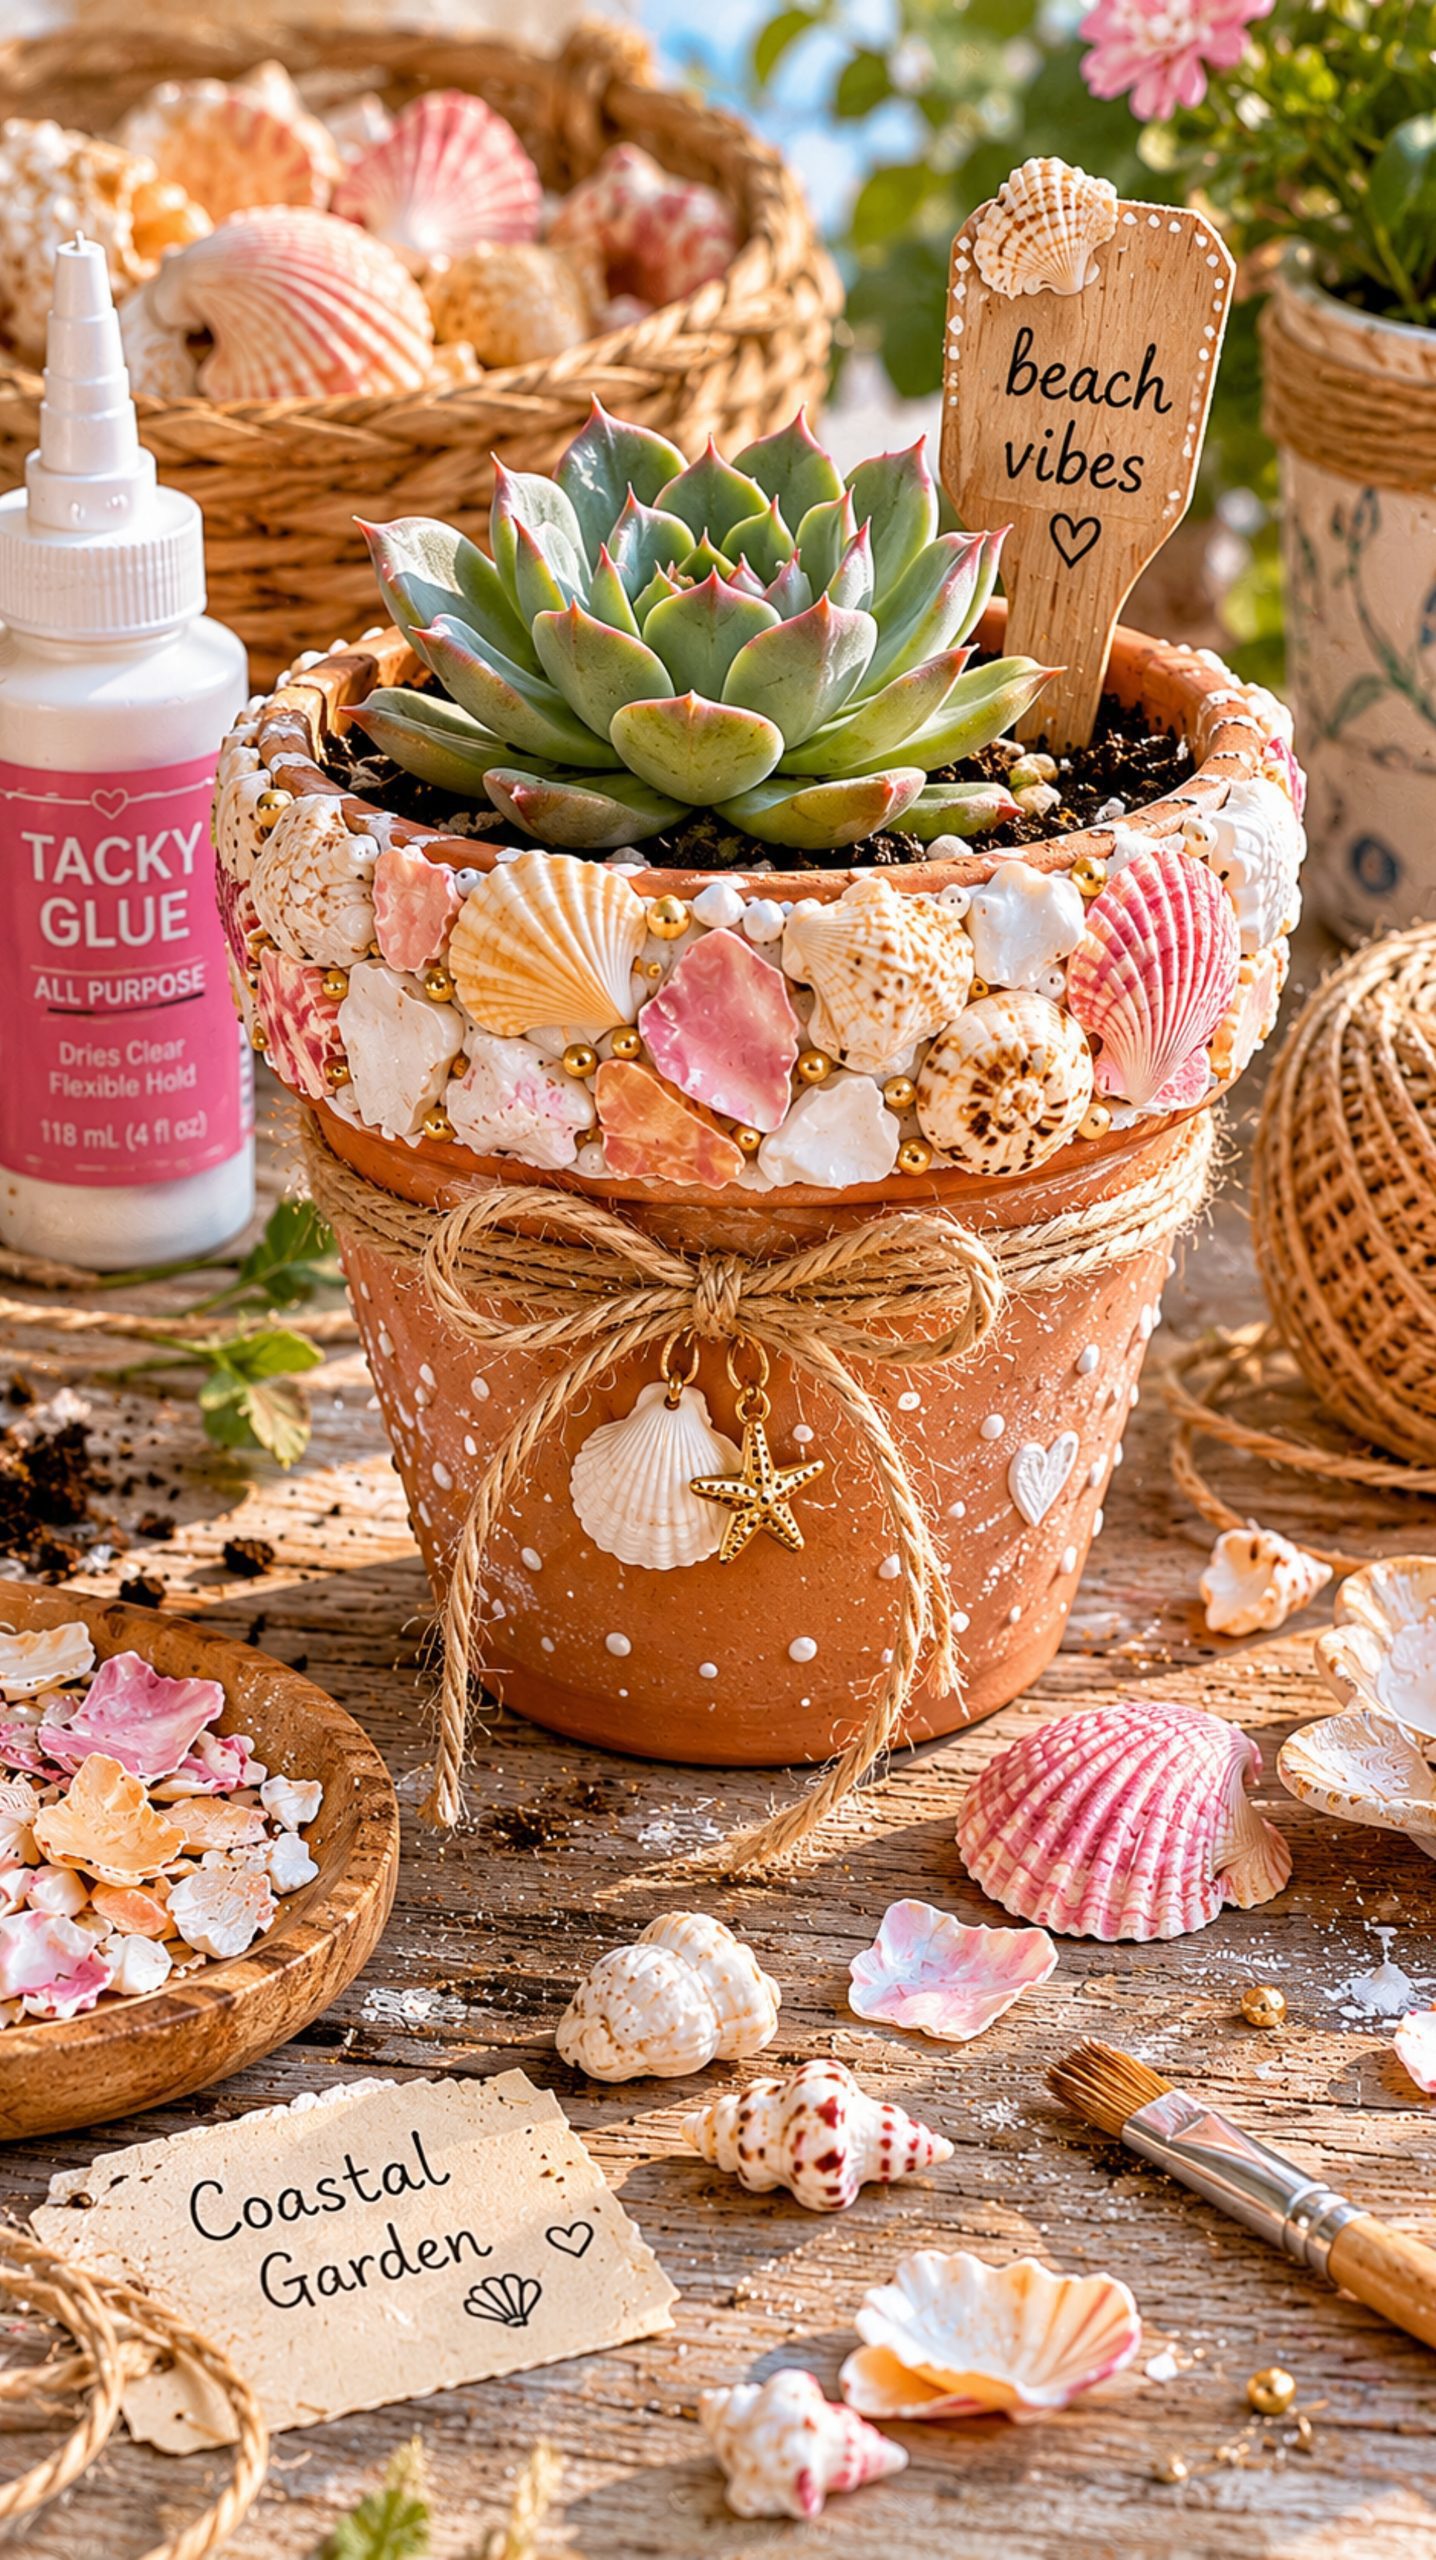
A plain terracotta pot becomes so much prettier with broken shells around the rim or lower edge.
You do not need to cover the entire pot. Sometimes just adding shells around the top border gives it that relaxed coastal feel without looking too heavy.
This is beautiful for succulents, herbs, or small patio plants. If the pot will stay outside, use outdoor-safe adhesive and seal the shells well.
What you’ll need:
- Terracotta or ceramic pot
- Broken shells
- Outdoor-safe glue
- Clear outdoor sealant
- Optional white paint wash
7. Broken Shell Mirror Border
A broken shell mirror border can look really elevated if you keep the color palette soft and organized.
Instead of placing shells randomly everywhere, try creating a textured border around a round or oval mirror. Use larger shell pieces first, then fill the gaps with tiny fragments.
This idea works especially well for a coastal bathroom, beach house entryway, or summer-inspired bedroom corner.
What you’ll need:
- Small mirror
- Broken shell pieces
- Strong adhesive
- Tweezers
- Clear sealant
8. Broken Shell Coasters With Grout
Broken shell coasters are a little more detailed, but they look amazing when finished.
Use a coaster mold or small tile base, place shell pieces in a mosaic pattern, then fill the spaces with grout. Once dry, wipe the surface clean so the shells show through beautifully.
This gives the project a more finished, handmade-shop look. It is also a great idea for summer gifts or coastal table decor.
What you’ll need:
- Tile base or coaster mold
- Broken shells
- Grout
- Sponge
- Sealant
- Felt pads for the bottom
9. Broken Shell Jewelry Pendants
Small broken shell pieces can become beautiful pendants, especially if they already have interesting shapes.
Choose smoother fragments and add a tiny jewelry bail with strong adhesive. You can leave the shell natural or add a very light coat of gloss to bring out the color.
This is such a delicate craft for handmade necklaces, summer market items, or simple beachy gifts.
What you’ll need:
- Smooth broken shell pieces
- Jewelry bails
- Strong jewelry glue
- Necklace chain or cord
- Clear gloss sealant
10. Broken Shell Decorative Tray
A plain wooden tray can become a beautiful coastal piece with broken shells added to the handles, corners, or inside base.
For a cleaner look, I would not cover the whole tray unless you are going for a full mosaic style. A border of broken shells around the inside edge feels more elegant and practical.
This would look so pretty on a coffee table with candles, books, or summer drinks.
What you’ll need:
- Wooden tray
- Broken shell pieces
- Craft glue
- Paint or stain
- Clear protective finish
11. Broken Shell Garden Markers
This is a sweet idea for herbs, flowers, or small garden pots.
Glue broken shell pieces onto wooden garden stakes, then write the plant names on larger shell pieces or small painted labels. You can keep everything neutral or add soft blue and green paint for a more colorful garden look.
It adds a tiny coastal detail to your plants without needing a complicated project.
What you’ll need:
- Wooden garden stakes
- Broken shells
- Paint pen
- Outdoor glue
- Outdoor sealant
12. Broken Shell Christmas Ornaments
Broken shells can also become really pretty coastal Christmas ornaments.
Use wood slices, clear ornament blanks, or small cardboard shapes as the base. Then glue shell fragments into a star, tree, angel wing, snowflake, or simple abstract pattern.
Add twine, ribbon, or a small pearl bead to finish it. This is such a good way to make beachy Christmas decor that still feels handmade and sentimental.
What you’ll need:
- Wood slices or ornament blanks
- Broken shells
- Glue
- Twine or ribbon
- Optional pearl beads
- Clear sealant
Final Thoughts
Broken shells do not have to be thrown away just because they are chipped or imperfect. With a little glue, a simple base, and a clear idea, they can become frames, trays, ornaments, jewelry, garden markers, and beautiful coastal decor pieces. The secret is to work with the natural shapes instead of trying to make everything look too perfect.
FAQ:
What can I make with broken shells?
You can make picture frames, trinket dishes, candle holders, wall art, coasters, garden markers, jewelry pendants, ornaments, trays, and small home decor pieces with broken shells.
What glue works best for broken shell crafts?
A strong craft glue or jewelry glue works well for small indoor projects. For outdoor projects, use outdoor-safe adhesive and seal the finished piece to help protect it.
Do I need to clean broken shells before crafting?
Yes, it is a good idea to rinse and fully dry the shells before using them. This helps remove sand, salt, and dust so the glue can stick better.
How do I make broken shell crafts look less messy?
Choose a simple color palette, arrange the larger shell pieces first, and fill small gaps with tiny fragments. Keeping the background neutral also helps the project look more polished.
Can kids make broken shell crafts?
Some broken shell crafts can work for older kids with supervision, but shell edges can be sharp. For younger kids, it is better to use smoother shell pieces and simple projects like decorating paper shapes or frames.
Some links in this post may be affiliate links, which means I may earn a small commission at no extra cost to you.