Introduction
A clay trinket dish is one of those small handmade projects that actually earns its place in the house. It can sit on a nightstand with rings, near the sink with earrings, on a desk with paper clips, or by the front door with keys and coins.
And the best part is that you do not need to be amazing at pottery to make one look pretty. A simple shape, a clean edge, a soft color, or one special detail can make the whole piece feel intentional.
These clay trinket dish ideas are perfect if you want an easy craft that feels useful, giftable, and beautiful at the same time. You can use air dry clay if you want something simple and no-bake, or polymer clay if you prefer a stronger finish with more color options.
What You Need to Make a Clay Trinket Dish
Before choosing your design, keep a few basic supplies close:
- Air dry clay or polymer clay
- Rolling pin or smooth glass bottle
- Craft knife or clay cutter
- Small bowl, plate, or template for shaping
- Sandpaper for smoothing the edges
- Acrylic paint or clay-safe paint
- Clear sealant or varnish
- Gold paint, metallic marker, or gold leaf if you want a finished look
- Small flowers, leaves, lace, stamps, or texture tools for details
For beginners, air dry clay is usually the easiest option because you can shape it, let it dry, sand it, paint it, and seal it. Polymer clay is great when you want brighter colors, marbled effects, or a more durable jewelry dish.
1. Soft Wavy-Edge Clay Trinket Dish
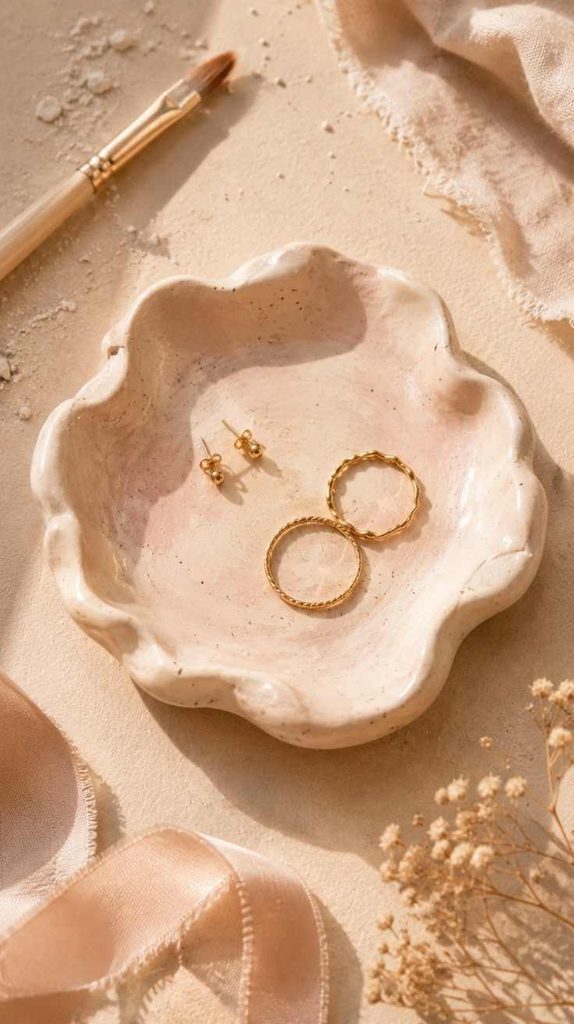
A wavy-edge dish is one of the easiest clay trinket dish ideas because it does not need to look perfectly even. Roll out your clay, cut a round or oval shape, then gently lift and pinch the edges with your fingers.
The beauty of this one is the handmade look. Keep it white, cream, blush, or terracotta for a soft minimalist style. After it dries, sand the edges lightly and add a glossy sealant so it feels finished.
This idea is perfect for holding rings, earrings, hair clips, or tiny everyday jewelry on a nightstand.
2. Painted Bow Clay Jewelry Dish
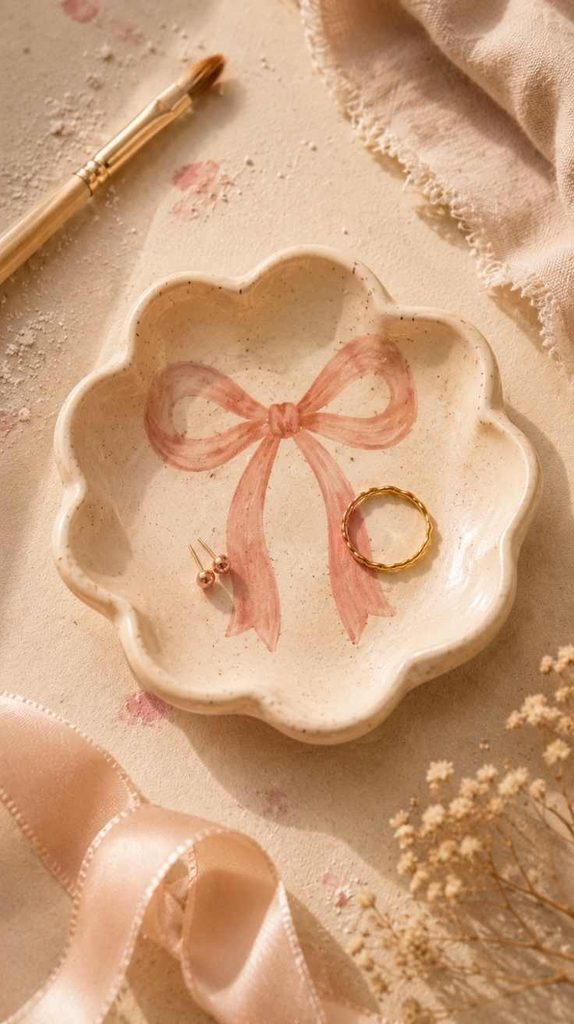
A bow detail instantly makes a clay dish feel more feminine and giftable. Make a small round or oval tray, then add a tiny clay bow to the top edge before it dries.
Once the dish is ready, paint the bow in blush pink, butter yellow, sage green, or soft blue. You can keep the inside of the dish plain or add tiny painted dots for a cute handmade touch.
This one would be beautiful as a bridesmaid gift, birthday gift, or a small vanity tray.
3. Lemon-Themed Clay Trinket Tray
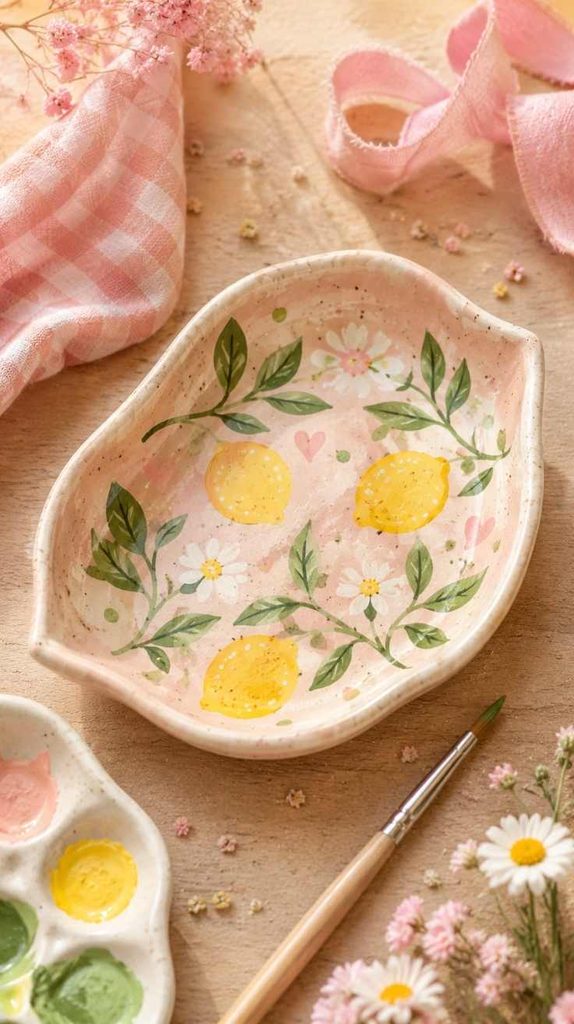
A lemon trinket tray feels fresh, cheerful, and perfect for summer decor. Shape the dish into a soft oval or organic round shape, then paint tiny lemons, leaves, and small white flowers after the clay dries.
Keep the base light cream or pale yellow so the design feels bright but not too busy. A glossy finish works really well here because it gives the dish that fresh ceramic-inspired look.
This idea is perfect for a kitchen shelf, bathroom vanity, or summer handmade gift.
4. Pressed Flower Air Dry Clay Dish
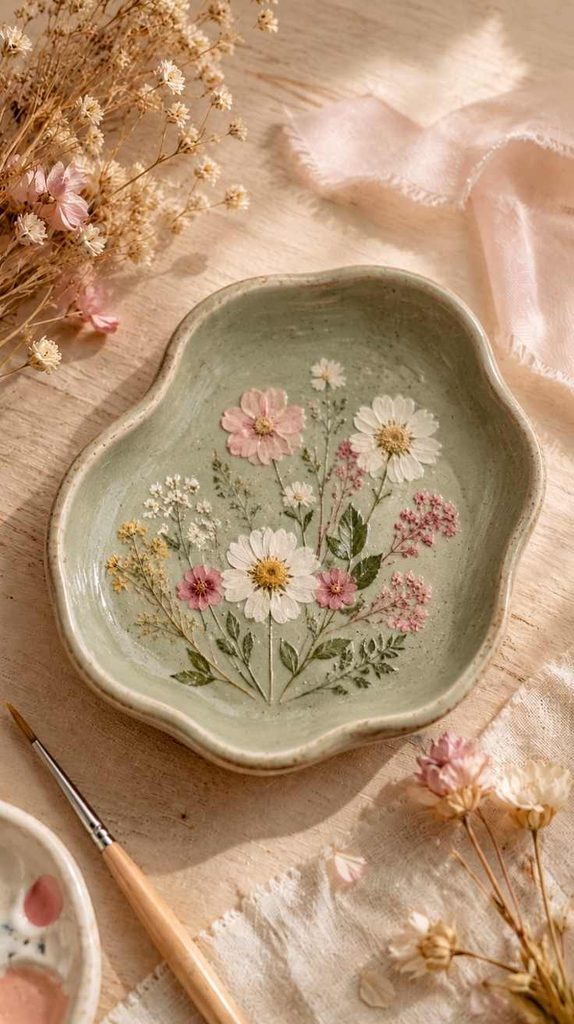
Pressed flower clay dishes are delicate without being complicated. Roll out your air dry clay, press small dried flowers or leaves into the surface, then remove them carefully to leave a pretty imprint.
You can paint inside the imprint with soft gold, dusty pink, sage, or lavender. Another option is to glue very flat dried flowers onto the dish after painting, then seal everything well.
This is one of the prettiest clay trinket dish ideas for people who love botanical decor.
5. Scalloped Edge Clay Ring Dish
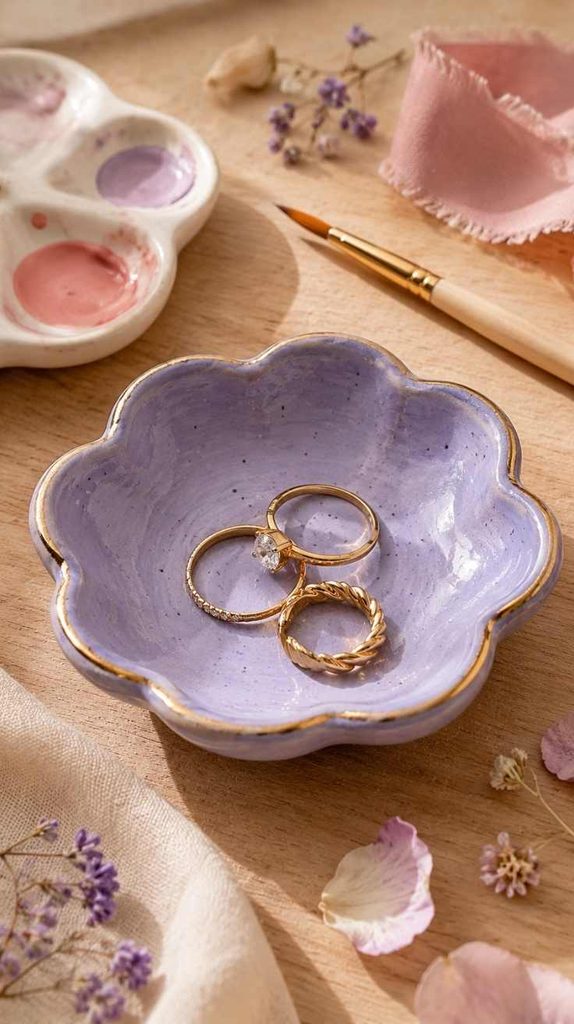
A scalloped edge can make even a very simple clay dish look more polished. Cut a circle from rolled clay, then use a small round cutter or the end of a piping tip to create soft scallops around the border.
Shape the clay inside a small bowl so it curves slightly. After it dries, paint the rim with gold, pearl white, or a soft pastel color.
This design is perfect for rings because the raised edge keeps small jewelry pieces from sliding off.
6. Speckled Ceramic-Inspired Clay Dish
If you want your clay dish to look more like something from a cute boutique, try a speckled ceramic-inspired finish. Paint the dish in cream, white, soft beige, or pale pink, then use a toothbrush or stiff brush to flick tiny brown or black paint specks over the surface.
Do this lightly so it looks handmade and not messy. Finish with a matte or satin sealant for a modern ceramic look.
This idea works beautifully for minimalist bedrooms, craft room desks, and small bathroom shelves.
7. Initial Clay Trinket Dish
A personalized initial dish makes a simple project feel thoughtful. Before the clay dries, use letter stamps, alphabet cutters, or a toothpick to add an initial in the center.
You can keep the letter subtle or paint it in gold after the dish dries. Add small dots, tiny flowers, or a painted border if you want it to feel more special.
This is a great handmade gift idea for friends, teachers, sisters, moms, or bridesmaids.
8. Vintage Floral Clay Jewelry Dish
For a more romantic look, make a small oval dish and paint tiny vintage-style flowers around the border. Think soft roses, little blue flowers, green leaves, and delicate curved stems.
You do not need perfect painting skills. Small simple brushstrokes can look beautiful when the colors are soft and repeated around the edge.
This clay jewelry dish would look gorgeous on a dresser with perfume bottles, pearl earrings, and a little candle.
9. Shell-Shaped Clay Trinket Dish
A shell-shaped dish is perfect for summer, coastal decor, or beachy rooms. You can use a real shell as inspiration, a paper template, or a silicone mold.
Create soft ridges with a toothpick or clay tool, then paint the finished dish in pearl white, pale blush, champagne, or iridescent paint. A gold edge makes it look extra pretty.
Use it for rings, tiny earrings, hair pins, or small bathroom items.
10. Strawberry Clay Trinket Tray
A strawberry dish is cute, playful, and a little different from the usual clay ideas. Shape your clay into a soft heart or rounded triangle, then paint it red or blush pink with tiny seed details.
Add a small green leafy top using clay or paint. If you want it to feel more grown-up, use a muted strawberry pink instead of bright red.
This idea is perfect for a teen room, cottagecore decor, or a sweet handmade gift.
11. Gold Rim Clay Catchall Dish
A gold rim is the easiest way to make a handmade dish look more finished. Make any shape you like — round, oval, square, heart, or organic — then paint the edge with metallic gold once it dries.
The trick is to keep the inside simple. A white or cream base with a clean gold rim looks elegant and works with almost any decor style.
This is a great beginner-friendly clay trinket dish idea because the shape can be simple and still look beautiful.
12. Lace Texture Clay Dish
A lace texture adds detail without needing to paint a full design. Place a piece of lace fabric over rolled clay, press it gently with a rolling pin, then peel the lace away.
Cut and shape the dish while the texture is still clear. After it dries, you can leave it natural, paint it white, or brush a little gold or beige paint over the raised areas.
This style is perfect for boho bedrooms, romantic vanity decor, or handmade wedding favors.
13. Cloud-Shaped Clay Trinket Dish
A cloud dish feels soft, dreamy, and cute without being too childish. Cut a cloud shape from rolled clay using a paper template, then gently curve the edges upward.
Paint it white, pale blue, lilac, or blush. Add tiny stars, gold dots, or a small moon if you want a celestial detail.
This is a lovely option for jewelry or a desk catchall tray.
14. Hand-Painted Checkered Clay Dish
A checkered pattern gives a clay dish a fun, modern look. Make a simple square, oval, or round dish, then paint a small checkerboard design in the center or around the border.
Try color combinations like cream and sage, blush and red, blue and white, or yellow and ivory. You can keep the pattern imperfect for a handmade look.
This idea is perfect if you want a clay trinket tray that feels trendy, colorful, and a little playful.
15. Tiny Heart Clay Ring Dish
A heart-shaped dish is simple, sweet, and always giftable. Cut a heart from rolled clay, then press it gently into a small bowl so the center curves slightly.
You can paint it in soft pink, white, terracotta, red, or even a marbled clay effect. Add a tiny gold rim or a small handwritten word like “love,” “mama,” or “rings.”
This is perfect for Valentine’s Day, Mother’s Day, bridal showers, or simple handmade gifts.
Tips to Make Your Clay Trinket Dish Look More Professional
The shape does not need to be perfect, but the finish matters. Smooth the edges before painting, let the clay dry completely, and do not skip the sealant.
If your dish feels a little rough after drying, use fine sandpaper very gently around the edges and surface. This small step makes the final piece look cleaner.
For painting, choose a limited color palette. Two or three colors usually look more elegant than using every color at once. Soft neutrals, pastel shades, metallic gold, sage green, blush, terracotta, and pearl white all work beautifully for clay jewelry dishes.
Can You Use Air Dry Clay for Trinket Dishes?
Yes, air dry clay works really well for decorative trinket dishes, especially if you are making them for rings, earrings, keys, coins, or tiny items.
Just remember that air dry clay is not the same as fired ceramic. It should not be soaked in water or used for food. To make it last longer, seal it with a clear varnish after painting.
Can You Use Polymer Clay for Trinket Dishes?
Polymer clay is another great option, especially if you want marbled colors, bright patterns, or a stronger finish. You will need to bake it according to the package instructions.
Polymer clay is nice for smaller ring dishes because it holds detail well and comes in many colors. It is also great for designs like marbled clay, checkerboard patterns, fruit shapes, and small sculpted details.
What Can You Put in a Clay Trinket Dish?
A clay trinket dish is perfect for small everyday items like:
- Rings
- Earrings
- Bracelets
- Hair clips
- Keys
- Coins
- Paper clips
- Tiny crystals
- Perfume samples
- Small desk items
- Mini craft supplies
It is one of those little handmade projects that looks cute but also helps keep tiny things from disappearing.
FAQ:
What is the easiest clay trinket dish for beginners?
The easiest option is a simple round or oval dish with a wavy edge. You only need to roll the clay, cut the shape, curve the edges, let it dry, paint it, and seal it.
Is air dry clay or polymer clay better for trinket dishes?
Air dry clay is easier for beginners because it does not need baking. Polymer clay is better if you want stronger colors, marbled patterns, or a more durable small dish.
Do clay trinket dishes need to be sealed?
Yes, sealing helps protect the paint and gives the dish a more finished look. Use a clear matte, satin, or glossy sealant depending on the style you want.
Can I sell handmade clay trinket dishes?
Yes, clay trinket dishes can make lovely handmade products to sell, especially when they have a clear style like personalized initials, floral details, gold rims, or seasonal designs. Just make sure your finish is clean and your materials are properly sealed.
Are clay trinket dishes waterproof?
Most air dry clay trinket dishes are not fully waterproof, even with sealant. They are best used for dry items like jewelry, keys, and small accessories.
Final Thoughts
Clay trinket dishes are small, but they have so much room for creativity. You can make them soft and romantic, colorful and playful, minimalist and modern, or personalized for someone special.
Start with one simple shape, choose one detail that makes it feel pretty, and keep the finish clean. That is usually enough to make a handmade clay dish look cute, useful, and gift-worthy.
Some links in this post may be affiliate links, which means I may earn a small commission at no extra cost to you.
