
The first time I carve a pumpkin, I don’t want a design that looks like it needs an art degree and three hours of patience. I want something simple enough to trace, easy enough to cut, and still cute when I turn the lights off and see it glowing on the porch.
These easy pumpkin carving ideas for beginners focus on larger shapes, fewer cuts, and designs that don’t depend on tiny fragile details. I would sketch everything first with a washable marker, work slowly with appropriate carving tools, and use an LED tea light or battery-operated candle inside whenever I want that cozy jack-o’-lantern glow without dealing with an open flame.
1. Simple Polka Dot Pumpkin Carving
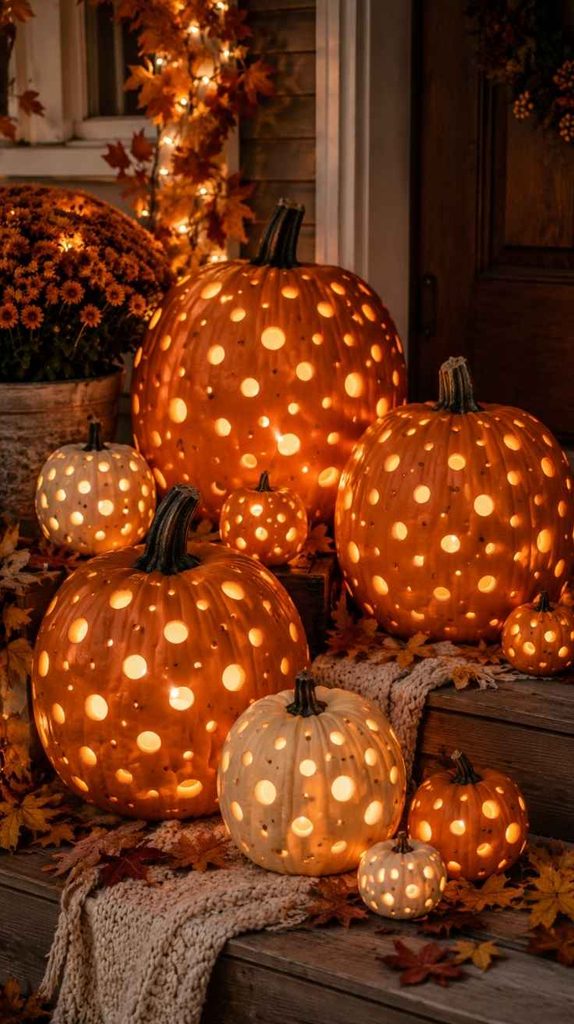
I would make this one by creating rows of large and small circular openings around the pumpkin, almost like oversized confetti. A washable marker can help me space the dots first, and a small round carving tool or appropriate drill-style tool can make the repetitive openings easier. Once I add fairy lights inside, all those dots would glow at different heights and create a really pretty lantern effect. This is one of the easiest designs I would try if I wanted something modern without carving a face.
Tools I’d Use:
- Washable marker – for marking where I want the larger holes.
- Hand carving tools – for carefully opening and cleaning up the larger circles.
- Mini rotary tool – for creating the tiny dots and pierced details.
- LED candle or fairy lights – for illuminating the pumpkin from inside.
2. Scalloped Edge Pumpkin Carving
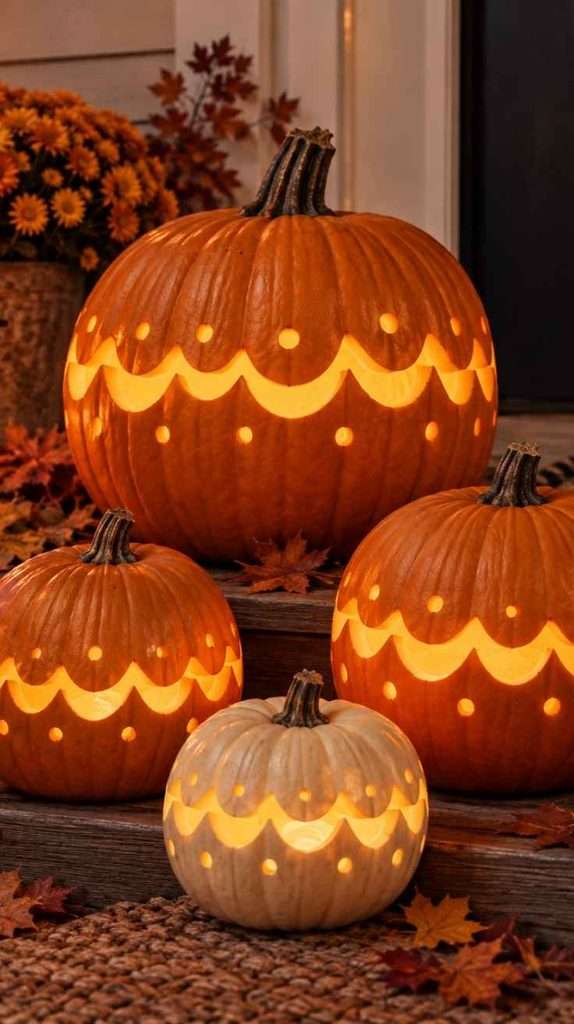
For this design, I would carve a repeating scalloped pattern around the middle of the pumpkin, almost like lace or the edge of a decorative plate. I would draw one large curved shape, repeat it around the pumpkin, and keep each cut wide enough that the remaining sections stay sturdy. A warm LED candle inside would make the pattern look especially pretty on a mantel or entryway, and the design feels decorative enough to work beyond Halloween.
3. Simple Leaf Pumpkin Carving
I would trace several chunky autumn leaves around the pumpkin using simple oval and pointed shapes rather than detailed leaf veins. Keeping the leaves large makes the carving much easier for a beginner, and I could add a few tiny drilled dots between them for extra glow. With a candle-style LED inside, the leaves would light up beautifully beside real fall foliage and neutral pumpkins.
4. Easy Geometric Pumpkin Carving
This one would use nothing more than triangles, diamonds, rectangles, and simple lines arranged into a repeating pattern. I would draw the design directly onto the pumpkin with a ruler or template, then carve only the larger sections. The clean shapes make it easy to follow, and when illuminated from inside, it would give the pumpkin a modern almost lantern-like look that could work with minimalist fall decor.
5. Simple Initial Pumpkin Carving
I would carve one large initial into the front of the pumpkin and keep the rest of the design very minimal. A printed letter template can make this much easier because I could tape it to the pumpkin, transfer the outline, and then cut around the shape slowly. I love this idea for a front porch because I could use a family initial, a child’s first letter, or even carve several pumpkins to spell a short word.
6. Easy House Number Pumpkin Carving
Instead of a traditional Halloween design, I would carve my house number into a large pumpkin for the porch. I would print the numbers in a bold, simple font, transfer them to the pumpkin, and keep the openings wide so they’re easy to cut and easy to see from the street. An LED candle inside would make the numbers glow after dark, turning the pumpkin into both fall decor and a cute seasonal address marker.
7. Simple Stripe Pumpkin Carving
For the last idea, I would carve wide vertical openings between some of the pumpkin’s natural ribs, leaving plenty of solid pumpkin between each cut. The shape of the pumpkin already gives me a guide, so I wouldn’t need to draw anything complicated. A warm light inside would shine through the stripes and create a dramatic glow with very little actual carving, making this one especially beginner-friendly.
A Few Beginner Pumpkin Carving Tips
For my first pumpkin, I would always choose a firm pumpkin with a relatively smooth surface because it is easier to draw on and easier to control while cutting. I would also start with larger designs rather than tiny detailed patterns, since wider openings are generally easier to carve and less likely to break.
I would keep a washable marker, scoop, carving tools, paper templates, and LED lights nearby before starting. If children are helping, I would let them choose the design, trace shapes, scoop seeds, and decorate while an adult handles any sharp cutting tools.
How I Would Light These Beginner Pumpkins
For most of these designs, I would use a battery-operated LED tea light or LED candle. Fairy lights are especially nice for the polka-dot and geometric pumpkins because they spread the glow across lots of smaller openings.
A real candle can create that classic flicker, but I would only use one in a stable, supervised spot away from dried leaves, fabric, ribbons, paper, or other flammable decorations.
FAQ
What is the easiest pumpkin design to carve?
Large circles, wide stripes, simple geometric shapes, and bold letters are some of the easiest because they require fewer complicated cuts and don’t rely on tiny connecting pieces.
Should beginners use a template?
I would. Even a very basic paper template makes it easier to keep letters, numbers, and geometric patterns consistent before I start cutting.
What tools are useful for beginner pumpkin carving?
I would keep a scoop, washable marker, small carving tools, and a simple pumpkin carving knife nearby. For dotted or pierced patterns, a small rotary-style tool can also be useful for decorative details.
Can I carve a pumpkin without making a face?
Absolutely. Some of my favorite beginner designs use dots, leaves, stripes, letters, numbers, or geometric patterns instead of a jack-o’-lantern face.
What light should I put inside a carved pumpkin?
LED tea lights and battery-operated candles are the easiest options for me, especially indoors or around other fall decorations. Fairy lights work beautifully when the design includes lots of small openings.
Final Thoughts
Beginner pumpkin carving doesn’t have to look basic. A simple pattern can look surprisingly impressive once it is illuminated, especially when I let the natural shape of the pumpkin do some of the work for me.
I would start with one of these easier designs, get comfortable using the tools, and save the more intricate pumpkin carving ideas for later. The goal isn’t a perfectly carved pumpkin—it’s creating something I actually enjoy making and want to light up again that night.
Some links in this post may be affiliate links, which means I may earn a small commission at no extra cost to you.