
There is something completely different about seeing a carved pumpkin after dark. During the day, it might just look like a few strange cuts and shapes, but once I put a light inside, suddenly the eyes look deeper, the shadows become dramatic, and that creepy grin starts looking back at me from the porch. That nighttime transformation is exactly what I want from a scary pumpkin.
For this collection of scary pumpkin carving ideas, I’m going darker than the cute and easy pumpkins I usually love. Think exaggerated faces, eerie silhouettes, creepy eyes, spiderwebs, and designs that look especially dramatic when illuminated.
1. Creepy Wide-Grin Scary carving Pumpkin idea
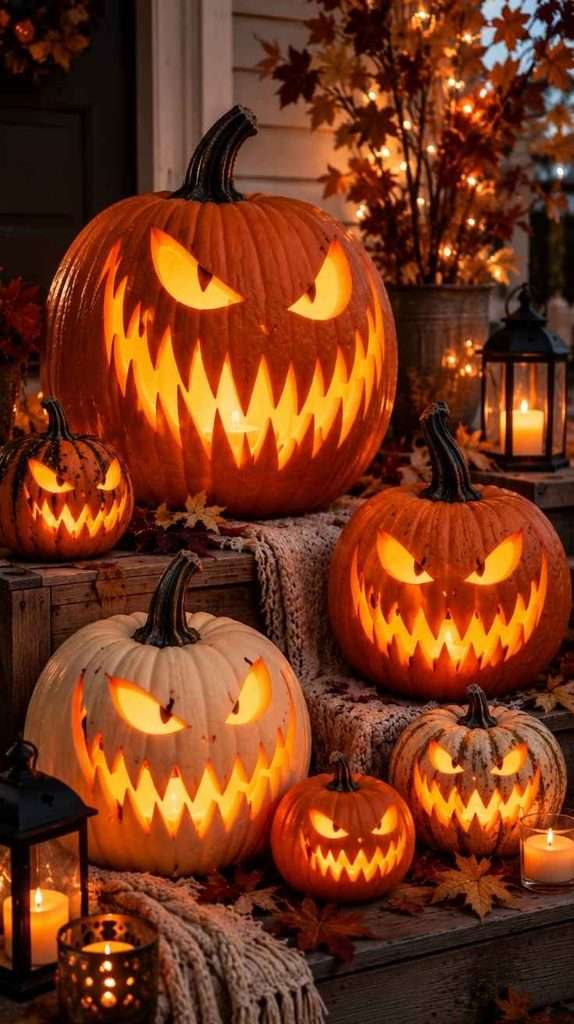
The oversized mouth is what makes this pumpkin work. I’ll need a washable marker, a carving knife or small carving tool, and an LED candle for the glow. I’d sketch the mouth almost from one side of the pumpkin to the other, adding uneven triangular teeth instead of trying to make them perfectly identical. Small narrowed eyes above the huge grin make the expression even creepier. Once the carving is finished, I’d place a warm LED candle inside so that enormous smile becomes the brightest part of the pumpkin after dark.
Tools I’d Use:
- Washable marker – to sketch the expression first
- Hand carving tool – for shaping the mouth and teeth
- Small detail tool – for cleaning around narrow sections
- LED candle – for a strong glow behind the grin
2. Creepy Eyes Pumpkin Carving
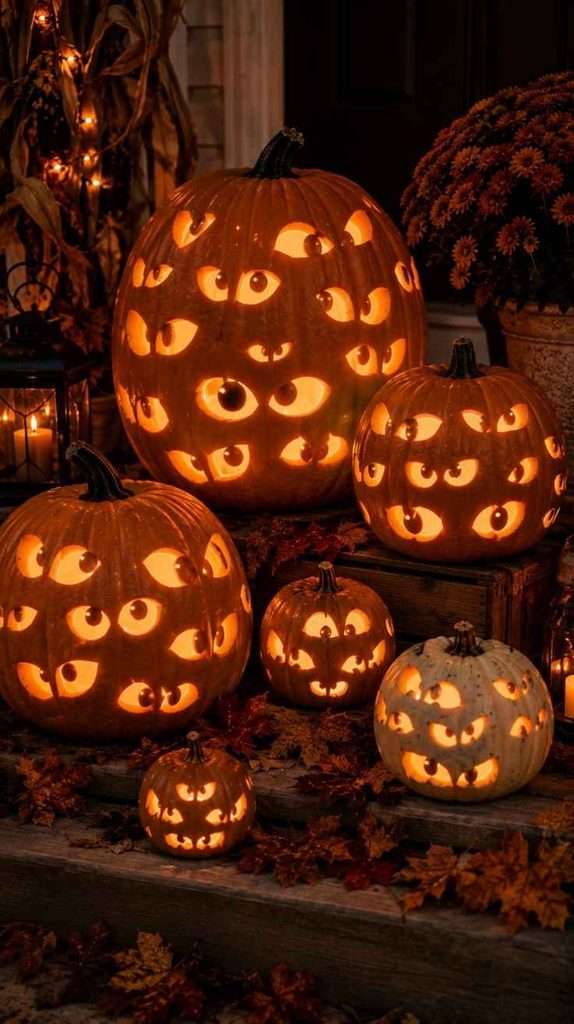
I don’t even need a mouth for this one. I’d cover one large pumpkin with several pairs of carved eyes looking in different directions, using a printed eye template if I want the shapes to stay consistent. Some can be narrow and angry while others are large and round, which makes the whole design feel slightly unsettling. Battery-operated fairy lights are perfect here because they spread light throughout the pumpkin and illuminate all those eyes instead of concentrating the glow in one spot.
Tools I’d Use:
- Paper eye templates
- Washable marker
- Small carving knife
- Detail carving tool
- Battery-operated fairy lights
3. Spiderweb Pumpkin Carving
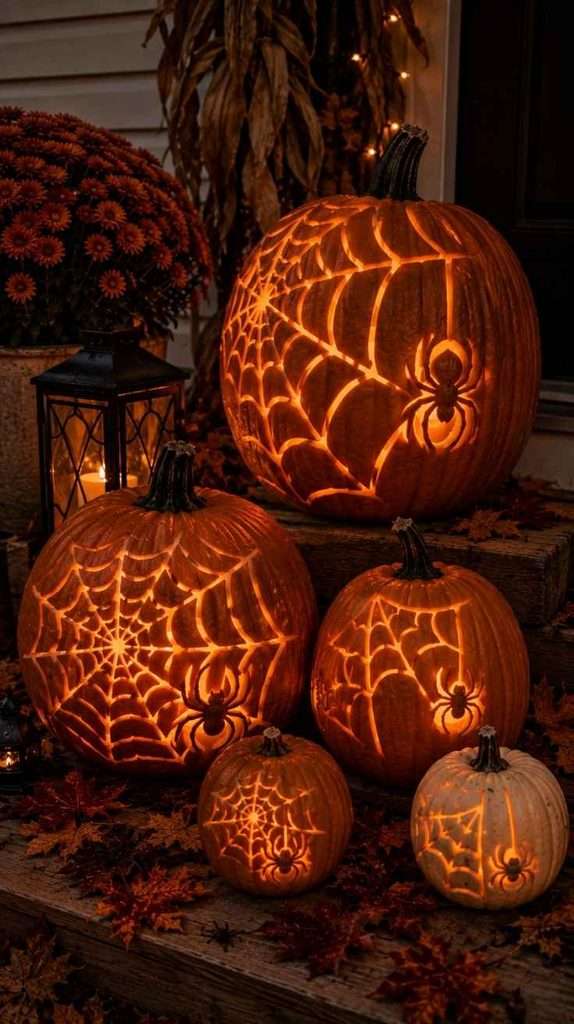
This design needs a little more patience, but I wouldn’t completely cut away every part of the web. I’d first draw several lines radiating from one point and connect them with curved sections to create the web. Then I’d carefully carve or shave selected areas so some parts glow brighter than others. A small spider silhouette in one corner would finish the scene. With an LED light inside, the mixture of bright openings and darker pumpkin skin should give the web much more dimension.
Tools I’d Use:
- Fine washable marker
- Small carving tools
- Detail or engraving tool – for the thinner web sections
- LED tea light
4. Screaming Pumpkin Carving
For a pumpkin that looks genuinely spooky without requiring an intricate pattern, I’d rely on three exaggerated openings: two long eyes and one huge stretched mouth. The shapes don’t need to be symmetrical—in fact, slightly crooked cuts make the expression more disturbing. I’d choose a tall pumpkin for this design because its natural shape makes the screaming face look even longer. A bright LED candle placed low inside will illuminate the mouth while leaving some shadows around the eyes.
Tools I’d Use:
- Washable marker
- Medium carving knife
- Scoop
- Bright LED candle
5. Haunted Forest Pumpkin
This one is more atmospheric than scary. I’d draw crooked tree trunks around the pumpkin, leaving irregular branches reaching toward one another near the top. Instead of cutting out every branch, I’d combine carved openings with shallow scraped areas to create layers of light. Tiny bats between the trees could be added with a stencil or small detail tool. Once fairy lights go inside, the glowing spaces between the dark trees should make the whole pumpkin look like a miniature haunted forest.
Tools I’d Use:
- Tree and bat templates
- Washable marker
- Hand carving set
- Mini rotary or detail tool – for small openings and texture
- Warm fairy lights
6. Skeleton Face Pumpkin Carving
A skull-inspired pumpkin can look impressive without needing dozens of tiny cuts. I’d begin with two large dark eye sockets, a small upside-down heart or triangle for the nose, and a wide mouth divided into chunky teeth. The important part for me would be keeping the teeth fairly large so I’m not fighting with fragile strips of pumpkin. A white or pale pumpkin would make this design especially striking even before the light goes inside.
Tools I’d Use:
- Skull template
- Washable marker
- Carving knife
- Narrow detail tool for the teeth
- LED tea light
7. Dripping Face Pumpkin
Here’s where I’d let the imperfect cuts become part of the design. I’d draw two irregular eyes and create a mouth with long dripping shapes extending downward, almost as if the expression were melting. Rather than making every drip identical, I’d vary their length and width. A small carving tool will give me more control around those curves, while an LED candle inside will make the long openings glow dramatically against the darker pumpkin.
Tools I’d Use:
- Washable marker
- Small curved carving tools
- Detail knife
- LED candle
8. Scary Stacked Pumpkin Faces
Instead of making one complicated carving, I’d use three pumpkins in different sizes and give each one a different scary expression. The largest could have a huge toothy grin, the middle pumpkin could have angry eyes, and the smallest could have a simple screaming face. Once they’re carved and illuminated separately, I’d stack or arrange them vertically only on a secure, stable setup so they don’t tip. This would make an incredible focal point beside the front door without requiring one extremely intricate pumpkin.
Tools I’d Use:
- Three pumpkins in different sizes
- Washable marker
- Hand carving set
- Scoop
- Three battery-operated LED lights
How I Make Scary Carved Pumpkins Look Better at Night
Lighting changes everything with scary pumpkin carving. For faces with one or two large openings, I prefer a bright battery-operated LED candle because it creates strong shadows around the features. When a design has lots of smaller openings—like the creepy eyes or haunted forest—I’d use a short strand of battery-operated fairy lights to distribute the glow more evenly.
A real candle can create the traditional flickering jack-o’-lantern effect, but I’d only use one in a stable, supervised location and keep it well away from dried leaves, fabric, paper, and other flammable Halloween decorations.
Pumpkin Carving Safety
Before I start, I always want the pumpkin sitting firmly on a dry, stable surface. I keep my free hand away from the path of the blade, make controlled cuts instead of forcing the tool through the pumpkin, and use smaller carving tools when I’m working around narrow details.
If kids are helping, they can draw the scary faces, choose templates, scoop out the seeds, and help style the finished display. I’d leave any work involving sharp cutting tools to an adult.
FAQ
How can I make a pumpkin look really scary?
For me, exaggerated proportions make the biggest difference. Narrow eyes, oversized mouths, uneven teeth, unusually long faces, and asymmetrical features tend to look much creepier than a perfectly carved traditional jack-o’-lantern.
What are some scary pumpkin carving ideas that aren’t faces?
Spiderwebs, haunted forests, bats, creepy eyes, silhouettes, and spooky scenes can all create a darker Halloween look without using a traditional face.
What tools help with detailed pumpkin carving?
For larger openings, I’d use basic hand carving tools. Smaller carving tools are helpful around teeth, eyes, and curved sections, while a detail or rotary-style tool can help with certain tiny holes, pierced patterns, and surface details.
What should I put inside a scary carved pumpkin?
I usually prefer LED candles or battery-operated fairy lights. A brighter LED works well behind a large scary face, while fairy lights distribute illumination across pumpkins containing lots of smaller carved details.
Do scary pumpkin carvings have to be difficult?
Definitely not. A huge crooked mouth or long screaming face can look incredibly dramatic while requiring only a few large cuts. Sometimes the simplest design becomes the scariest once the pumpkin is glowing in the dark.
Final Thoughts
What I like about scary pumpkin carving ideas is that perfection isn’t really the goal. Crooked teeth, uneven eyes, rough branches, and exaggerated expressions can actually make a pumpkin look better because the irregularities become part of its personality.
I’d mix a few dramatic carved pumpkins with lanterns, autumn leaves, mums, and warm lights rather than making the entire porch overwhelmingly scary. That contrast between cozy fall decor and creepy glowing pumpkins is exactly what would make the display stand out after dark.
Some links in this post may be affiliate links, which means I may earn a small commission at no extra cost to you.